
Update: welcome from Pinterest! Check out this post for my easy tutorial on tufting with a staple gun, this post on a simple, flat upholstered headboard from an old slatted bed frame, and this post on a tufted headboard that I made for our guestroom.
Original instructions on how to build a tufted headboard from Apartment Therapy are linked, and there are plenty of great suggestions in the comments!

Tufted headboards are chic and lovely, and look great in any bedroom. They are that perfect balance: soft and comfy but equally classy and modern; somewhere between masculine and feminine without leaning this way or that. You can go bold with your color choice or keep it sleek and simple in a bright white and it remains perfectly appealing.


Find these beautiful pre-made headboards: {top two pictures} teal by Laura Ashley, tangerine red headboard found at The Nest, {four picture block} white headboard from Katy Elliot, Home Shopping Network features this satin gold (and many other colors at a very budget friendly $299), Decor Pad shares the grey headboard with us, and the beautiful brown is by Brocade Home.
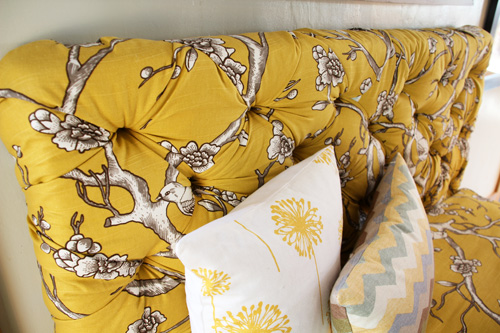
The top, top picture is from the featured How-To article today:
{DIY Tufted Headboard}
p
From: Apartment Therapy
Cost: $110
TOOLS & SUPPLIES:
1/2″ Plywood
1×4″ Lumber
Foam (at least 2″ thick)
Polyester Batting Upholstery
Fabric
Upholstery Thread
Upholstery Needle
Button Kit and Buttons
Scissors
Spray Adhesive
Wood screws
Bolts
Staple Gun and 1/2″ Staples
Tape measure
Drill Hammer
Optional but helpful: Rubber Mallet Electric Knife
Checkout Apartment Therapy or one of the top links for the full how-to!


I have yet to make my version of the tufted headboard but I plan to use a cheap memory foam mattress pad from Walmart as my form, a cheap blanket as my batting and I am going to do my tufts the cheating way with screws and gluing the buttons overtop the screws. I’m cheap and like to cut corners where I can and I’m sure I’m not the only one! (:
Try a staple gun rather than screws! Another quick tip :).
Great instructions! Me and my cousin made these together and were so shocked by how expensive the foam was, so we used egg crates that you’d use on a bed and it was much cheaper!
i have a question i have concrete walls how are what could i do to attach headboard to wall without messing the wall up i live in goverment housing thanks
Hi Jennifer, I didn’t actually attach my headboard to the wall, I just set it between the wall and my bedframe (which is holding the mattress so it’s plenty heavy enough to support the headboard).
I hope that helps!
Morgan
Hi
I love this and in my house this could be just what I need as my house is a story & half and my bedroom walls are slanted …leaving lettle room for a head board. But a home made one like this would work~ Thanks
One question?? After putting on the foam on the plywood…why do you need batting besides over that? Could you not just cover with the fabric after the foam? If not…why not?
Thanks
Heather
Hi Heather! I think batting is a nice second layer because it helps to round out the square edging of the foam underneath, creating a smooth and soft cushion. It’s not absolutely necessary though and you could forego that step if you wanted to, but my first choice is always 1.foam 2. batting for a softly rounded headboard.
Great tutorial!
For those asking about ways to attach the headboard, try a French cleat.
Cut a piece of lumber(the length of your headboard), cut it on a 45 degree angle. Attach one to the wall and the other onto your headboard.
Super easy when the hardware store will make the cut for you
Great suggestion! Thanks Cyndi :).
You can also buy a metal version of this at home depot (about $14) that will hold up to 200 lbs as its made for heavy art pieces…perfect for this project. Also to lighten the load I used pegboard instead of plywood for the backing. Its strong and has pre drilled holes that are already perfectly spaced, just count the holes and you have exact measurements for your buttons! I have done two of my own headboards and used these tips with great success, good luck!
Great tips!!
You had said in the beginning you wouldn’t recommend a pattern, why is that?
Hi Kelly!
If you find an awesome patterned fabric that you love I say go for it. I’ve found that patterned fabric tends to show flaws a bit more over solid fabric, but if you’re aware of the issues and are careful to watch out for bunching, patterned lines that begin to distort, etc then you might have a lot of fun with a patterned style. I’ve found that patterned fabric works best with headboards that are not tufted and that are perfectly rectangular rather than curved.
One common issue I ran into is that a solid fabric hides flaws that result from pulling and stapling the fabric to the back of your headboard. Because you’ll be securing your fabric every 4-5″ or so (and not every 1/2″), there will be obvious signs of give and tautness in the fabric on the front. A solid color will hide these, a pattern will be more obvious because the pattern might be out of line in a few areas.
Good luck!
I dont understand exactly what you mean by foam? could you elaborate for me, i am getting a new mattress soon and i think this would be wonderful.
Hi Emma, Here’s a helpful link to a fabric headboard that I actually made myself with images of the layers of foam that are wrapped around the original wood frame: http://www.pepperdesignblog.com/2010/08/09/diy-fabric-headboard-for-the-master-bedroom/. The foam portion is that off white/yellow 4″ material that helps to cushion and pad the headboard and it can be found at fabric stores such as Joanns. Let me know if you have any other questions that I can help with :)
Hi, I fasten the buttons at the back with another button and ty the end of the thread together! Simpel and tight as you want it!
That’s a great solution as well, Anne!
When I saw this, I immediately imagined that I would just cover the plywood with the foam and fabric, then staple-gun or nail it where the tufts go and then glue a button over the staple/nail. I didn’t realize there was so much involved in doing real tufts! Has anyone ever tried it the cheater way?
Hi Eileen, here’s a link to my most recent tufted headboard: http://www.pepperdesignblog.com/2012/03/28/office-makeover-a-new-tufted-linen-headboard/, I made tufts with a staple gun and glued on fabric buttons!
Oh, awesome! It looks great!
Approximately how much yardage of fabric did you use?
Hi Melissa! Usually about 2 yards for the front and edges, and another 1.5 ish for the back (sometimes in the same fabric and sometimes in a contrasting solid).
I just went and bought our supplies – the plywood (already have it), grand total was 177.00…..the foam was 30.99 a yard!!!!! :( OUCH! Fabric was 21.00 a yard….
I know! I feel your pain. The 40% off coupons at Joanns are a life saver for that expensive foam! $31/yard seems especially high.
I did one of these and used a combo of cotton batting sheets and a thinner foam. It may not have been quite a cushy but it looks great and has served me well for less $
Thanks, Lorna! I did this shortcut too for our guestroom :).
I would love to try and make one, thanks for a wonderfful tutorial.
What if I don’t have a bed frame? I want to attach the headboard directly to the wall since our bed sits on a low platform. Any suggestions?
I did something similar to this by placing the headboard between wall and low platform. I just smooshed it between and I’m definitely not worried about it falling over. If you don’t have plaster walls you might be able to use a bracket to attach to wall, though I’d be worried about finding a perfectly placed stud :). See reply to Jan for a link to the headboard I made.
~ Morgan
you can buy a metal “french cleat” (which i learned that’s what it’s called on this site)thats normally made for hanging heavy art pieces. Its got several holes and about a foot and a half of length to accommodate wherever your studs are in the wall. Relatively inexpensive too at about $14 at home depot in the hardware section, I use these for my headboards simply because I don’t want to deal with the lumber. I buy a set of 4 tiny nuts and bolts for about $1 to attach the piece that goes on the back of the headboard (need to attach before you put the foam on) because the normal mounting hardware is just regular screws.
Morgan,
I’m getting ready to tackle this project.
I’m needing to ask you about the 1 x 4 pieces of wood that will attach to the matress frame. I’m just not sure about that part, how to fit it onto the frame, etc.
Could you explin that part to me and, if possible post a photo showing it the best you can.
Tht would be lots of help for me.
Thanks so much!
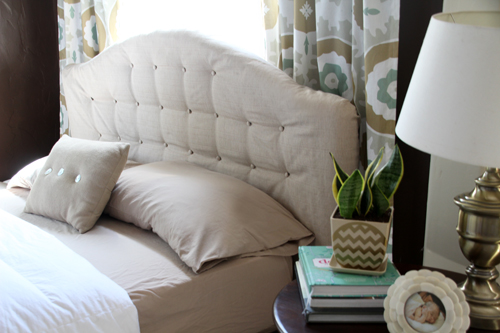
Hi Jan, I’ll answer this question here and then email you as well to make sure that you see my comment :). When I made a fabric headboard for our guestroom (read more about that here: http://www.pepperdesignblog.com/?p=6749) I made the headboard out of an older wooden headboard and slid the legs of the old headboard behind our basic platform bed (which has no headboard). You can see the overlap of the slightly larger new headboard in pictures here: http://www.pepperdesignblog.com/?p=10610. This meant that we didn’t have to actually attach the wood to the existing mattress frame, the headboard was essentially being held up by being placed between the bed and the wall behind it. I did play with the idea of actually rebuilding the frame to support the new headboard and used a tutorial on Ana White’s website (http://ana-white.com/) to start to build a bed frame. I abandoned the idea when I realized how much easier it will be to switch out the fabric with our current solution for future changes!
I hope that helps :).
~Morgan
Making a headboard is fairly straightforward. One piece of advice I can add that I found to be not only helpful, but also gives a smoother look to the end result is to use an old sheet (light color) prior to putting on the actual fabric.
Basically doing step 6 in this tutorial twice.
I know it seems like extra work, but it makes the actual upholstery fabric go on easier and you don’t fight the fabric sticking to the foam and batting.
I’ve done this a few times, and it makes my fabric lay smoother and look richer!
Thanks, Jan! That’s a wonderful suggestion!
~Morgan
You can also use inexpensive calico as the under layer. I use two layers of fabric because it makes it easier if you want to change out the top fabric later on – everything stays nicely together & under tension, so you can just add new fabric & re-tuft…
Great idea!!
Just wanted to let you know that I have learned a little more about upholstery since making the above headboard and adjusted my tutorial accordingly. You can find the updated steps here:
http://orange-sugar.blogspot.com/2009/02/make-your-own-headboard.html
Thank you for the update! Beautiful job.
Thank you for a great post
I would love to make my own tufted headboard! Let’s find a Saturday morning and do it!!
Let me know if you decide to make one. I’ve wanted one for a long time, but always cringed at the price tag. I’ve considered DIY-ing it but terrified to do it alone!