Pepper Design Blog

A Little of This & That... Renovating, Decorating, DIY Projects & Family

pepper_header_flower

Girls’ Room: Designing the Wallpaper in Spoonflower

March 17, 2014 by Morgan

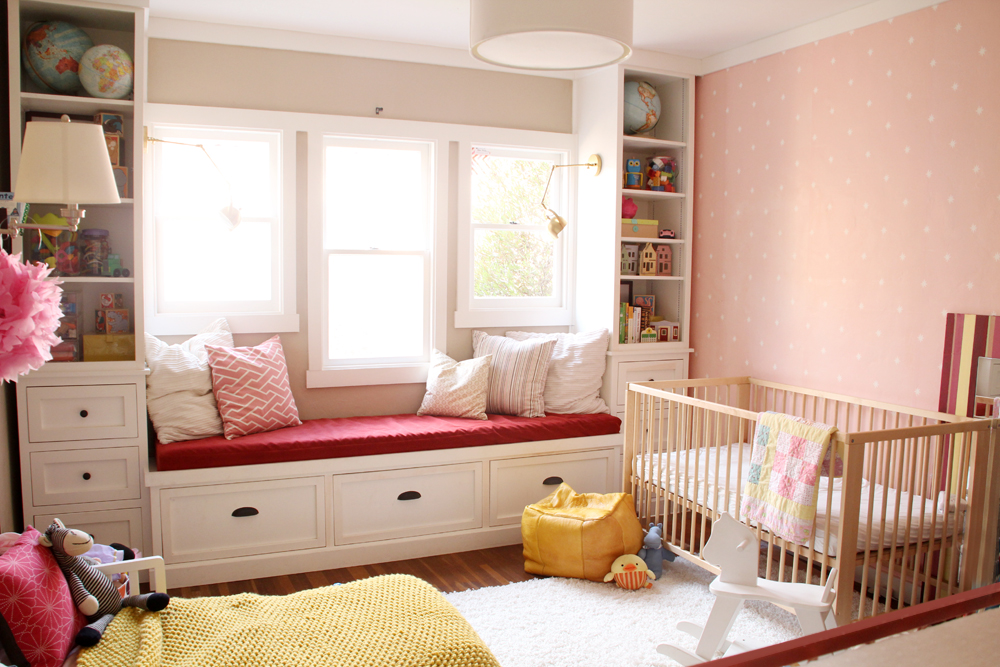
I’m really smitten with the wallpaper in the girls’ room.

Girls' Room Update: March 2014 | PepperDesignBlog.com

I went through a lot of ideas for creating a feature-something in this space, and in the end designed and printed my own wallpaper through Spoonflower, though I’m not sure I’ve ever really walked through the process here before.

Designing Wallpaper for the Girls' Room in Spoonflower | PepperDesignBlog.com

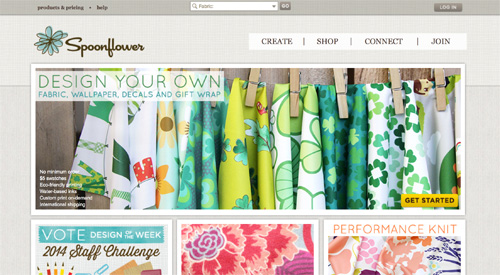
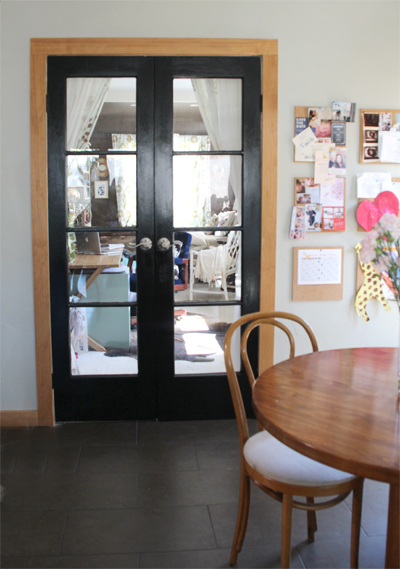
Spoonflower is just awesome. We have curtains I designed a few years back in the office, and a canvas ‘art’ piece hanging and framed in our living room that I found by another Spoonflower artist.

Designing your own fabric, wallpaper or gift wrapping paper is a small part of the Spoonflower universe. One of my favorite resources for new creative patterns for the home (thousands and thousands!) is to browse Spoonflower using their color sorter (that was my strategy for finding that above semi-diy canvas print).

Designing Wallpaper for the Girls' Room in Spoonflower | PepperDesignBlog.com

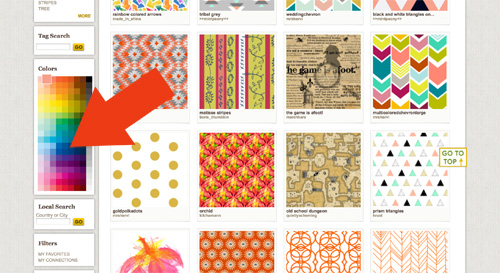
Simply type in a keyword such as ‘chevron’ and then use the color swatch to narrow down until you find exactly what you’re looking for. So. much. amazingness.

If you find a wallpaper pattern that you love, they’ll even show you a mockup of the scaling of that pattern in a room.

Designing Wallpaper for the Girls' Room in Spoonflower | PepperDesignBlog.com

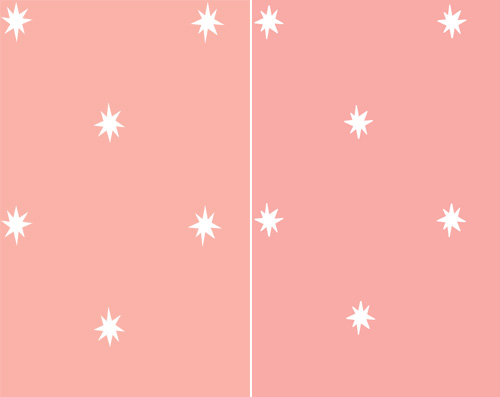
When I imagined adding an accent wall in the nursery, I imagined something subtle, something simple, something that would play well with other patterns in the rest of the space. I actually ordered a mix of Spoonflower samples to try out initially, six pretty found patterns already uploaded by others to Spoonflower and two slight color variations of my own starry night pattern.

Nursery Wallpaper Samples : PepperDesignBlog.com

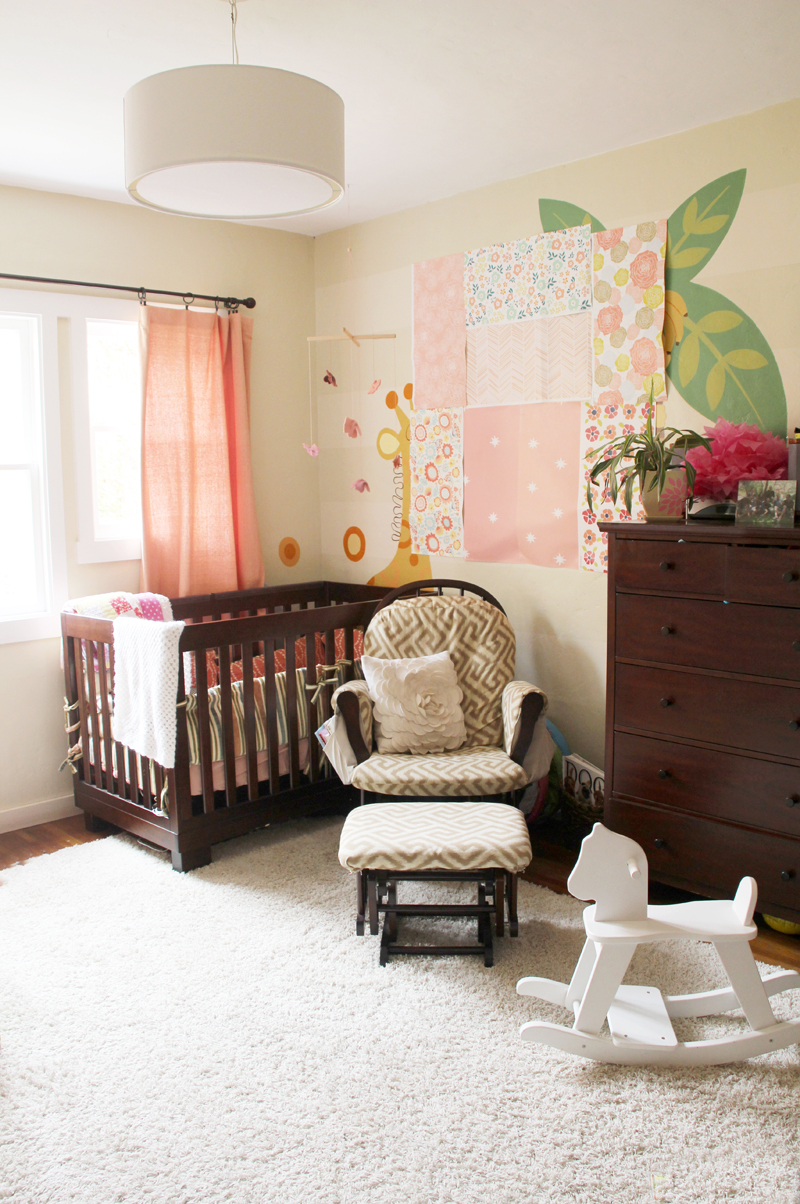
I loved them all! But being keen on plenty of pattern in this room, I ended up choosing the most subtle of the samples (those two panels in the lower center) because they would allow for more pattern layering.

I came up with that simple starry design after being inspired by a bathroom in black Osborne & Little Coronata wallpaper.

Designing Wallpaper for the Girls' Room in Spoonflower | PepperDesignBlog.com

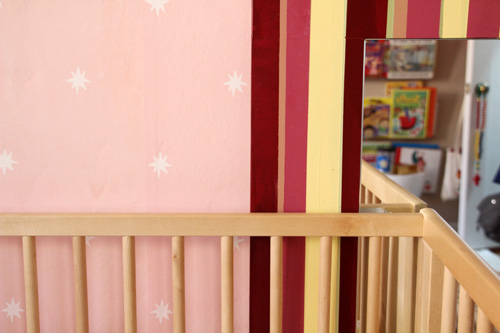
I changed the colors, the style of star (to something more abstract with rounded edges) and the pattern so that it wasn’t a direct replication.

That process was a process though! It’s nice to imagine that uploading and printing a design is as simple as just that, but it actually took me close to three months to get the wallpaper just right, including the amount of time between each iteration that Spoonflower needs to get your pattern through the printer and shipped out to you.

Designing Wallpaper for the Girls' Room in Spoonflower | PepperDesignBlog.com

I use photoshop and illustrator to create most of my designs. Photoshop is really for adjusting and manipulating photos which are created from small dots of color (pixels), while illustrator is ideal for shapes and designs because you are working with vector paths that can be stretched and resized without damaging your content (opposite of photos). There is much out there regarding that topic that you can find with a quick google search…

Designing Wallpaper for the Girls' Room in Spoonflower | PepperDesignBlog.com

Designing Wallpaper for the Girls' Room in Spoonflower | PepperDesignBlog.com

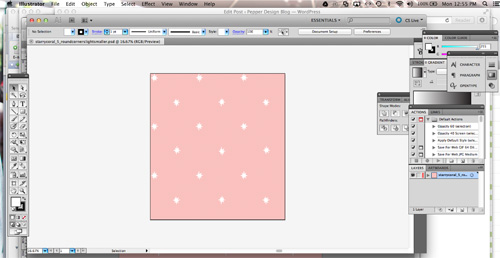
To create a repeating pattern, I prefer to cut the pattern into a perfect square with two edges butting up against an obvious design/shape in the pattern, and the other two edges cutting just before that same design/shape. When I repeat this out in Illustrator to test it, it creates a perfectly repeating pattern.

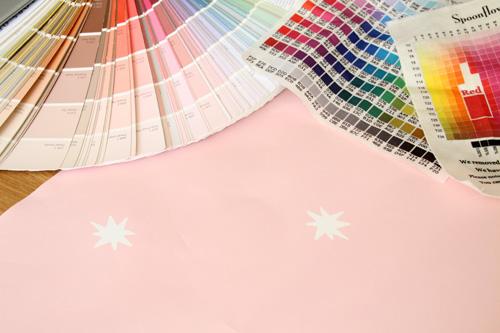
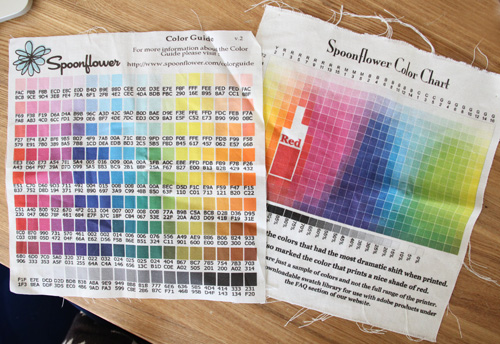
Working with colors in Spoonflower is the most challenging part of the job. It’s helpful to have the Spoonflower color chart for reference (they’ll ship you a square for $1, request also the fabric swatches booklet if you’re printing on fabric) and I use both their older format (on the right) and newer version (on the left) to get the colors just right.

Designing Wallpaper for the Girls' Room in Spoonflower | PepperDesignBlog.com

The above is for color reference, the eyedropper tool in photoshop then helps me to reference the correct hex color (each color has a formula, that’s the formula). I’m always shocked at what the color looks like on the screen vs. printed out.

Designing Wallpaper for the Girls' Room in Spoonflower | PepperDesignBlog.com

I went through eight different scaling and color options before settling on the correct size and shade of pink/coral for the nursery. I find it best to have several swatches printed at the same time with a variety of shading and scaling in each batch so that you’re not waiting on Spoonflower printing for long chunks of time…

Designing Wallpaper for the Girls' Room in Spoonflower | PepperDesignBlog.com

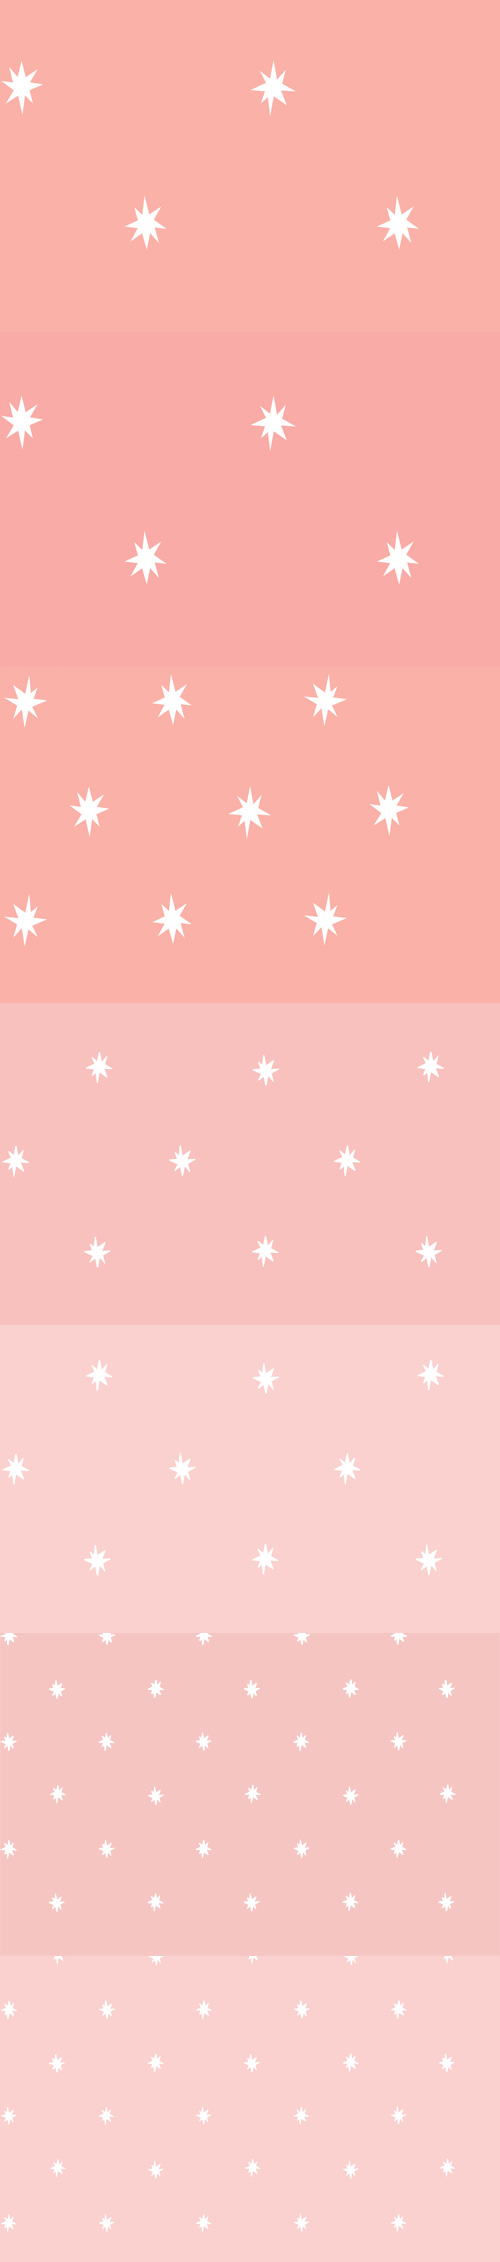
I even went back and forth between a pointed and rounded star design – sometimes the devil’s in the details.

Designing Wallpaper for the Girls' Room in Spoonflower | PepperDesignBlog.com

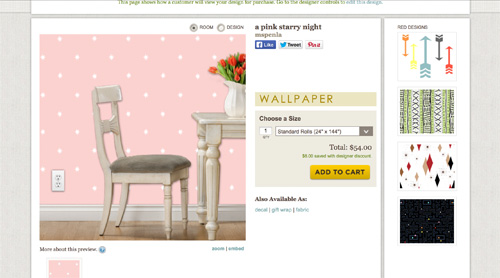
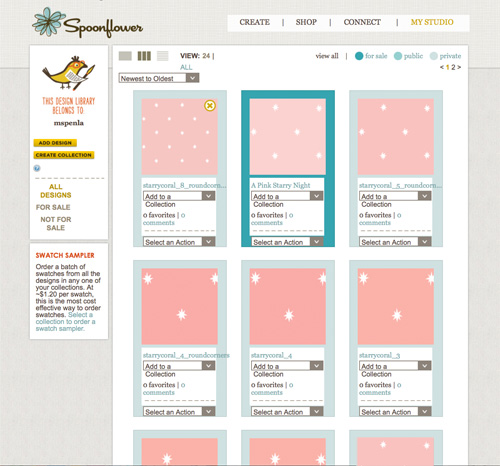
Here’s how that crazy mess looked in my design library within Spoonflower (you can actually purchase my final design right here, you can also make designs private but I thought I’d share the love if anyone else is interested in a similar look).

Designing Wallpaper for the Girls' Room in Spoonflower | PepperDesignBlog.com

Whew!

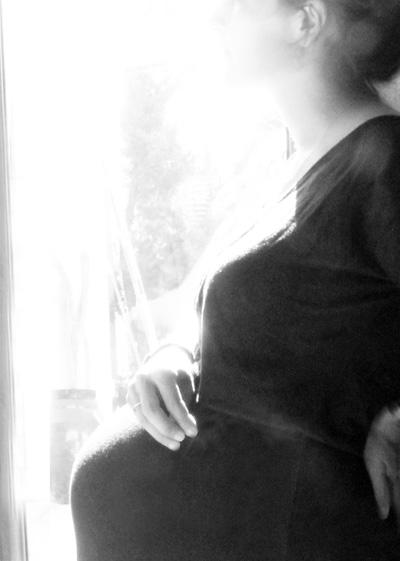
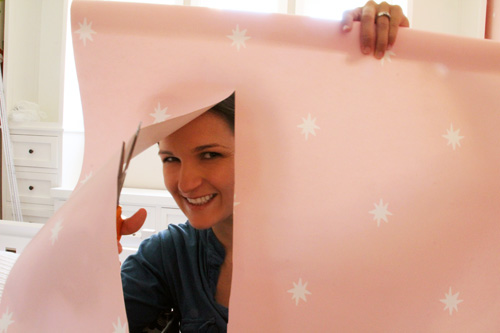
The best day is when your rolls of wallpaper arrive! I was eight months pregnant when my brother and I installed the panels.

Tips for Hanging Wallpaper | PepperDesignBlog.com

But so worth it.

There are just two things that I hope will change over at Spoonflower as the popularity increases: time to print and ship (production time) and that the wallpaper will be printed without the need to overlap panels at the seams.

Girls' Room Update: March 2014 | PepperDesignBlog.com

Happy St. Patty’s Day! More of a pink rather than green post today, but hopefully you’ll find it useful! Or that you’ll checkout the great designers over at Spoonflower sometime soon (it’s like Joann’s on steroids).

PS if you’re looking for a paint color that is awfully close to this wallpaper, try Rose Radiance by Olympic.

- posted on March 17, 2014 Filed Under: Crafty Solutions, DIY, Girls' Room, Home, Liv's Nursery, Projects, Renovating Adventures, Tips & Ideas Tagged With: Spoonflower, wallpaper

Random Thoughts: Baby Names

March 14, 2014 by Morgan

What's in a Name | PepperDesignBlog.com

What are your thoughts on names? Baby names are the sorts of things eight-year-olds (and twenty-eight-year-olds) agonize about. ‘Liv’ was a name I have loved forever, ‘Olivia’ the only name that Kevin truly adored when I was pregnant with number one. He said he would call her ‘Love’.

Amazingly, the name ‘Taylor’ has been on my list for a solid decade. That feels like a long time in baby naming years. Taylor was perhaps second or third on my list with baby number two (the above is not necessarily the chosen order), but even growing in my belly I always felt that that would be her name. Kevin, too.

Liv | PepperDesignBlog.com

Taylor Rose is Here | PepperDesignBlog.com

I remember calling my very favorite baby doll ‘Sydney’ as a little girl. I was sure that that’s what I would name my own children when I grew up and out of my five-year-old boots. Not surprisingly ‘Sadie or Saidey’ (rather close?) is a very favorite of mine today and was at the top of the Taylor-naming-game list.

The one other name (besides Taylor & Liv) that we both really enjoyed was Meredon. It was sort of a play on sailing and the sea… (mer meaning sea and meridian a line of longitude or a common directional reference for sailors). We have a sailboat from Kevin’s bachelor days and it was a favorite pre-child San Diego Bay hobby. I also liked that it was one-of-a-kind. But then that movie Brave came out.

What's in a Name | PepperDesignBlog.com

A funny story behind Liv’s name is that we were really unsure of what to name her even as I was in labor and at the hospital. I had a natural birth and after agonizing pain and she finally arriving, I remember Kev leaning over and saying ‘so I’m going to text everyone that Olivia is here’. I was so exhausted that I just nodded and then fell asleep.

An odd thing happens after you finally give your child their name though. They become that name. They are that name. You can’t imagine them being named anything else.

Easter Eggs | Liv | PepperDesignBlog.com

During our name-agonizing pregnancy days (actually, just mine. Kev had always had just one or two names that he stuck by), I had a close friend make that statement to me and it brought me much peace. I think that I was always nervously worried that I would regret the name I eventually chose. It’s such a huge responsibility! This child will apply for their first job with that name, introduce themselves to new friends with that name, sign love letters with that name, hear that name called out at their college graduation and on their wedding day. 

And nick names? Where do I begin.

Maybe I was overthinking it.

Olivia_Jan20-2011_007_475

You know what’s kind of odd? My lists of names changed drastically between the two girls. I’m not sure more than two or three baby number one names crossed over to the baby number two list.

Random Thoughts: Baby Names | Taylor Belly Shot | PepperDesignBlog.com

Just for fun, a few of the other names I loved for Liv included ‘Madelene’ (that how a friend spells it and I love it), ‘Emma’, and I think ‘Clare’. There were many others but they must have not made a strong enough impression for me to remember as I type this.

Liv & Taylor | PepperDesignBlog.com

Middle names are a whole other beast. Anne is my middle name and my mom’s middle name (it’s a common middle name but it’s peppered throughout our families). I felt strongly about giving my daughter, and I didn’t know how many I’d have, that middle name.

Because we went with tradition for the first, Kev and I just came up with the prettiest name we could think of for the second. I was incredibly close to giving Taylor my very special (and recently passed) Grandma’s name (Vivian) or my own first name (Morgan), too. I also love when mom’s pass on their maiden name as a middle name. In the end we went with our gut and brought a ‘Taylor Rose’ home from the hospital.

Random Thoughts: Baby Names | Taylor Belly Shot | PepperDesignBlog.com

If we have a third (and we’d like to) I have no idea what we would name him/her. Somehow we ended up on the top 100 for baby names with the first two, maybe next time something really unique? Or something really traditional? We actually didn’t know if we were having a girl or boy with Liv, so we have a decent list of untapped boys names :), too. Here’s how we found out Taylor was a baby girl.

Do you still admire any of the baby names your six-year-old self chose? How did you (or how will you) choose your children’s names? Are yours traditional, unique, sentimental?

- posted on March 14, 2014 Filed Under: Family & Friends, Motherhood, Olivia, Random Thoughts, Taylor Rose

Kitchen Update: Salvaging French Doors

March 13, 2014 by Morgan

So back to these doors…

Black French Doors | PepperDesignBlog.com

The crazy thing about these french doors is that they have been on my mind for almost three years. Perhaps since the day we installed them back during the office & big kitchen build.

officedemo2_doors

It doesn’t hurt that I walk through them umpteen times a day as I wander from kitchen to office and back to the rest of the house again during my usual routine. This is my zone right here, my commute, my little world in a single transit path.

Black French Doors | PepperDesignBlog.com

I have spent a lot of time staring at those doors.

When we found these doors waiting to be recycled on the side of the road (and then asked permission from the homeowners before taking), we were thrilled to have found something so big (and pricey) and full of history – they were just what we were looking for for this exact space in our kitchen/office transition.

Unfortunately refinishing these doors was such a very long journey. It took about 2 years and nine months longer than I expected to find a way to close them (doors should, by all means, naturally know how to do this) and about 2 weeks longer than I expected to fill holes, prime, paint and install hardware, once I built up the courage to paint them (in order to close them). I think that sometimes that’s just the nature of the DIY beast. And a happy end result makes it all so worth it.

I shared more about why, even after sanding and rehanging, these doors went black here, but in the quick and dirty it was two part: first, we weren’t really able to restore them to an unfinished wood glory despite a lot of time and resources:

Kitchen French Doors Before | PepperDesignBlog.com

Kitchen French Doors Before | PepperDesignBlog.com

And second, the very old and unique double jointed shape of the doors and latch system meant that finding a proper handle set would be near impossible. (In fact, the near throw-in-the-towel moment came when I had a historically accurate window and door reproduction carpenter tell me that I would probably never really be able to find the existing locking mechanism for this door to match the holes that were in place. My heart fell about three inches when he said those words because we had just assumed it would be so easy).

Kitchen French Doors Before | PepperDesignBlog.com

Two months ago I was close to spending some of our savings on new custom french doors for this space since doors that closed and functioned were a growing must to keep my work-from-home professionalism alive.

Kitchen French Doors Before | PepperDesignBlog.com

But my ah-ha moment came about two weeks later and none-too-soon. Friends of ours were hosting a super bowl party at their new home and about half way through the party, I watched as one of their young sons went from his bedroom into the living room through a narrow set of french doors. When he turned around to shut the doors behind him, there was a little ‘click’ of door shutting satisfaction – but no latch. I hopped off of the sofa and investigated immediately. At the top of the door was a small cup that ‘caught’ a small rod (topped with a ball) as the door closed. Why hadn’t any of these professionals shared this idea with me? It was such a happy moment!

It worked just like this:

ball_catch

source

That week I raced to a specialty hardware store and picked up their last little baggie of 6 ball and cup latches for $5. Problem solved and I could ignore the existing latch holes on the door to make this all work. No major drilling necessary.

But before any door latch could be installed, I had a seriously naked door to contend with.

kitchen_blackfrenchdoors_painting_primer_500

Using a bare wood primer was a recommendation to me that I almost passed up. I’m not a huge fan of priming anything, it feels very much like a useless extra step in most circumstances and I hate to do double the work (love me a solid paint+primer in one). BUT I heeded warning and am so glad that I did. This initial coat of primer was a breeze to apply and it made painting on my glossy black latex paint afterwards feel like buttah.

kitchen_blackfrenchdoors_painting_primer2_400

Raw wood absorbs a lot of the moisture out of your paint leaving you with a slightly courser, grittier surface. By using the primer as this initial surface, my final coat of black on the doors was smooth and pretty.

kitchen_blackfrenchdoors_painting_primerdone_400

It did take a few hours to get this sucker finished. I taped off the hinges and molding but I didn’t worry about the glass panes because I had heard how easy it is to scrap these free of paint with a razor. In hind sight it was possible but not so easy, I wish I had taken the 20 minutes needed to tape off the paint to save myself an hour or more of scraping towards the end.

Then it was on to black. I wanted the glossiest black I could get my hands on.

Kitchen French Doors Before | PepperDesignBlog.com

I initially imagined using an oil based paint for the type of finish I was leaning towards. The paint experts told me that either latex or oil would do and would provide similar results, so in the end I went with latex since I think that it’s so much easier to apply and clean up.

I suppose I should mention here that the correct order would have been to fill those massive latch holes prior to my primer, but I was a little anxious (and short on time) the weekend I tackled these doors and needed to accomplish as much as possible during my free time. So while I waited on collecting more supplies to correctly patch the latch holes, I threw on the primer and first coat of black.

When it did come time to patching the holes, I took a three-phased approach that took me about a week to finish up (using the spare time I had here and there).

kitchen_blackfrenchdoors_painting_cuttingdowel_400

I didn’t rush the process because my goal was ultimately to do this right.

The first step was to fill the unnecessary extra latch holes with small cuts of wood and dowels pieces cut to size.

kitchen_blackfrenchdoors_painting_dowel_400

I applied wood filler over the wedged and tapped-into-place wood cuts in the doors and let dry, sanding when finished.

Kitchen French Doors Before | PepperDesignBlog.com

If you take a look at the top right though, you’ll see my disappointment with my first filling technique. The wood filler became porous when dry and took on an odd shape – not smooth at all, even after much sanding. You can even see the porous nature through a coat of primer, which I was hoping might hide more texture.

kitchen_blackfrenchdoors_painting_filler2_400

Determined to do this job better, I followed the suggestion of a neighbor and used an epoxy putty next. My choice? All-Purpose Bondo Putty (originally made for cars, now apparently for use on anything).

kitchen_blackfrenchdoors_painting_bondocan_500

It’s a two part system with quite a few chemicals. I recommend a mask and keeping your windows wide open.

Black French Doors | PepperDesignBlog.com

Once the two parts are mixed together well, the mixture can be applied to the holes with a spatula, just as the wood filler was added.

kitchen_blackfrenchdoors_painting_bondo2_500

kitchen_blackfrenchdoors_painting_filler1_400

Soft and smooth and perfect for priming! I can’t speak highly enough regarding Bondo for these sorts of fixes. A quick note here that Bondo dries in less than five minutes while wood filler takes closer to twenty. Wood filler is easier to mold and manipulate (even with your fingers to get the shape just right) while with Bondo you probably would want to avoid contact. They each have their own perfect purposes.

Kitchen French Doors Before | PepperDesignBlog.com

Kitchen French Doors Before | PepperDesignBlog.com

Building up the rough spots and patching the door purposefully (with plenty of sanding in between) felt like I was doing the doors justice. I probably sanded and reapplied wood filler or bondo or paint (or whatever step I was on) many times over about five days until I was happy with the patch.

The next step was to install the ball and catch at the very top of the doors. These were pre second coat of white paint (again, a little out of order but sometimes you tackle what you can get done or what you might have help with in that moment).

Kitchen French Doors Before | PepperDesignBlog.com

Kitchen French Doors Before | PepperDesignBlog.com

Now when the doors were shut – they stayed shut with that satisfying ‘click’! Woohoo! A sweet, sweet sound for the ears.

Black French Doors | PepperDesignBlog.com

To open and shut those doors we installed dummy handles. Dummy handles drill right into the door and don’t actually open or close a locking mechanism. They’re perfect for a spot such as this one.

Black French Doors | PepperDesignBlog.com

Black French Doors | PepperDesignBlog.com

There they are! Done and done. It feels great to have this project crossed off of our list.

Kitchen French Doors Before | PepperDesignBlog.com

I’m pretty proud that I finished these up, and now my commute from the office and home again is so much prettier. :)

PS more pictures of the above and process of building the office & new-from-scratch kitchen. All of the black french door ‘after’ photos posted here, and great black door inspiration right here.

Related Posts Plugin for WordPress, Blogger...

- posted on March 13, 2014 Filed Under: Construction, Crafty Solutions, DIY, Home, Our Guestroom/Office, Our Kitchen Remodel, Projects, Renovating Adventures Tagged With: Black, Black French Doors, Doors, Kitchen, Office, Paint

  • « Previous Page
  • 1
  • …
  • 109
  • 110
  • 111
  • 112
  • 113
  • …
  • 438
  • Next Page »

Welcome to my little slice of the web where I practice finding family, career, homemade & inspired balance on a daily basis. This is where I capture my happy moments, and I'm honored that you're here to join us. Home + creativity + good eats + journaling + life as a working mom. Read more...

  • Email
  • Facebook
  • Google+
  • Instagram
  • Pinterest
  • RSS
  • StumbleUpon
  • Twitter

Search

Categories

Craft Projects CategoryCrafty Projects Good Eats & Recipes CategoryGood Eats Entertaining Ideas CategoryEntertaining Ideas Decorating Projects CategoryDecorating Style Boards CategoryStyle Boards Everything Holiday CategoryHolidays

Daily Dose

Favorite Posts

Dog Days of Summer: Craft Kits for Kids

Summer Craft Kits for Kids

August is a slower month for our family. Preschool summer school is out, dance lessons are taking a brief break for the month, our family vacation is

Our Double Stroller: Mountain Buggy +One Review

A Mountain Buggy +One Double Stroller Review

I'll preface by saying that this is not a sponsored review - we've found an awesome double stroller and we love it! Our Mountain Buggy + One has served

Wardrobe Style Board: A Work-From-Home Uniform

Wardrobe Style Board: A Stay-At-Home Mom Uniform | Cropped Light Jeans, Tan Sven Clogs, White Madewell V-Neck T-Shirt, Colorful Necklace, Gold Earrings | PepperDesignBlog.com

tan clogs | pocket tee | light jeans | gold disc earrings | colorful necklace It's not uncommon for people to come and go from our house all day long,

Happy 2nd Birthday, Taylor Rose!

Happy 2nd Birthday, Taylor Rose! An Infographic for My Girl | PepperDesignBlog.com

This weekend Taylor turned two. Taylor is such a bright, wonderful light in our lives. She is our funny, spunky little daughter that will do just about

How to Listen to Audiobooks on OverDrive

Intro to Audiobooks on OverDrive Public Library | PepperDesignBlog.com

Liv has developed a big interest in audiobooks as of late. One of my favorite ways for her to spend her 'quiet time' while Taylor and Marley nap is for her

Pistachio, Caramel & Sea Salt Chocolate Bars

Pistachio, Caramel & Sea Salt | Father's Day | PepperDesignBlog.com

Father's Day is not so far away, so here's an easy gift idea that can be made in advance or (literally) the night before. Homemade chocolate bars can be

Liv & Taylor-isms

Liv & Taylor-isms | Funny Things Kids Do & Say | PepperDesignBlog.com

Sometimes I capture something so funny/adorable/sweet that I can’t help but make note of it. Because Taylor is now expressing herself in full sentences, I

30 Things That I’ve Learned By 30

30 Things I've Learned by the Age of 30 | PepperDesignBlog.com

Today is my 30th birthday. I don't feel much older, but hearing that number roll out of my mouth feels as though I'm closing on a big chapter in my

Featured

Featured
VRBO San Diego Flying Bridge Vacation Rental cool toys for kids

Favorite Topics

Welcome to my little slice of the web where I practice finding family, career, homemade & inspired balance on a daily basis. This is where I capture my happy moments, and I'm honored that you're here to join us. Home + creativity + good eats + journaling. Read More…

  • Email
  • Google+
  • Instagram
  • Pinterest
  • RSS
  • StumbleUpon
  • Twitter
May 2025
MTWTFSS
« Feb  
 1234
567891011
12131415161718
19202122232425
262728293031 

Copyright © 2025 · Foodie Pro Theme by Shay Bocks · Built on the Genesis Framework · Powered by WordPress