
Update: our faux fireplace screen made it into This Old House! Check out the details here.
Six ish months ago we had to turn the gas off in our fireplace… which was such a downer as there’s nothing more amazing than flipping that little gas switch and watching a beautiful, blazing fire set the mood for your living room. Perfect for chilly nights that call for family games on the living room rug or for a late night Netflix. But alas, this is an older home with old fireplace issues and we had to switch her off.
Hopefully one day she’ll blaze again.

Until that day it’s time to turn the eye-sore innards of this old fireplace (black bricks, metal curtain and goldish top plate and all) into a prettier focal point for the room. Enter Pinterest Challenge, Winter 2013.
I love these little challenges because they provide the motivation to cross a big project off of the massive to-do list, and usually I can justify choosing a project that I more love and want to complete, and less of one I must do because it’s next on the priority list. Here are a few past projects that we’ve tackled around here, including painter’s tape wallpaper, gold chevron napkins and an ombre stool for Liv (one of my favorites) among others.

With a little motivation, a week to track down materials and a great inspiration picture, I had an idea of where to start.

Oooo I love the above image! What a great way to utilize the empty space in a fireplace while still keeping a room cozy and comfortable (fireplaces and stacked wood have a way of doing that…).
Our finished project… drumroll…

I would be very happy if you thought we went and stacked a bunch of logs in our fireplace and called it a project! But I promise it was much more than that. The goal here was to build a faux log stack facade that we could remove when we were ready to use the actual fireplace, and replace the next day once the fireplace was cool again.

The hope was that the screen would give the depth and perception of a a bunch of stacked wood, but really it would be just a few inches thick and somewhat easy to pop in and out.

What do you think? Are we fooling anyone?


Now on to building the screen!
*******************************************************************************
Fireplace Faux Wood Stack Facade
m
Materials: ~50 variously sized log slices, plywood cut to the shape of your fireplace opening, black matte paint, wood glue (or nail gun) UPDATE: some readers have had success ordering logs from Amazon
I ran into the first big road block while tracking down the actual logs. You’d think that this would be fairly easy… but turns out smaller logs (unchopped) in lighter wood colors (such as birch rather than oak or redwood) are not always readily available in these desert parts of San Diego. Who would have guessed.
I really lucked out when a friend of ours suggested eucalyptus and then found a huge pile of firewood for the taking! And he generously handed over variously sized logs for me to include in the project (thanks, Dave). Other resources that might be useful? Craigslist and Etsy (turns out you can even purchase sliced logs for the right price).
Kevin chopped up my logs into 3″ slices and I began assembling my faux stacked wood.

The backing for our fireplace screen is a piece of plywood measured, cut to size and painted black.
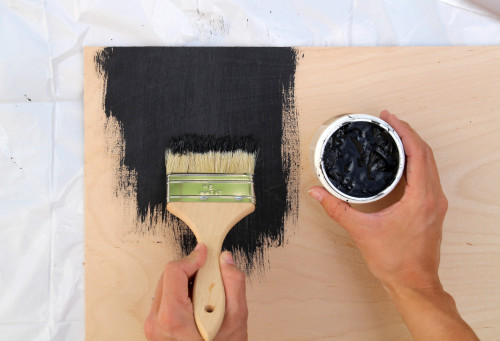

I considered spray painting it but we had only a satin finish in the paint closet, so I used up a bit of leftover chalkboard paint that we had on hand (from this and this project) to achieve a more matte finish (the above is still wet, but once this paint dried it was more than perfect).

Our nail gun is out on loan at the moment or I would have simply lined up my log slices, laid the backing over the top and fired away to secure the slices to the backing and to keep the logs from moving, but instead I lathered each slice individually with a thin coat of wood glue and allowed the entire project to dry overnight (that stuff is tough). When we get the nail gun back I’ll add extra reinforcements to ensure that none of these logs come sliding down, especially with toddlers at play.

I opted for a 3″ depth on the log slices (rather than 1/2″ or something easier to manage/less heavy) so that they would add more depth to the fireplace and (hopefully) make the black backing a bit more invisible. In person it’s obvious that this is a faux fix to our little fireplace conundrum, but it’s a neat faux finish at that!
Should I paint out that gold top plate a darker, oil rubbed bronze color?

That might be step two to this project, looks kind of nice!

*******************************************************************************
I’m linking this project back to Katie’s, Sherry’s, Megan’s and Michelle’s Link Parties today!
PS all Pinterest Challenge projects are sorted here, and all living room projects can be found here.


Looks awesome! Gonna have to try this over the next holiday break.
I was wondering how did you place the board/wood pieces in the fireplace opening? Did you add a footing of some sort? I am just wondering if this would fall over one way or another without some support.
Hi Katy, we slid the board under the lip of our existing fireplace box :).
Great idea! I was able to achieve the same effect in a much simpler way . by covering a piece of foam board with some very cool IKEA fabric which has a black background, and stacked logs on it.. I used spray adhesive to apply the fabric to the board. and put a long twiggy wrought iron candleholder in front of it on the hearth with some large Luminara candles on it that I turn on and off with a remote control. (They look like real flames, but without the fire hazard) The effect is absolutely stunning–had lots of compliments at Christmastime.
I’ve seen that fabric before at Ikea, great idea!
oh my got to go to ikea and do that. love the real wood but to much effort right now in my life but the fabric sounds wonderfully simple. I am very happy right now thank you
Would you plesse send me a picture of the way u did out t. It siunds so much easier. I would really appreciate it. Thank u.
sh*********@ya***.com
Hi! All of my photos of how I made this are actually in this post. Thanks!
I have followed what have you done but birch log slices start cracking when I dry them. Have you done something to prevent cracking of log slices?
Hi Jay, I didn’t run into any cracking issues with my logs but they were already dry, dry when I was working with them. I’m sorry I don’t have a better suggestion for you :(.
Hi!
I was wondering, in about a month there’s going to be a lot of Christmas trees leftover, do you think I can use them??
I love this so much and can’t wait to do it!
That is a great idea!!
Hello,
Where do you suggest I can get this wood from to create this look?
Thanks :-)
Thanks for your comment! A friend found mine by the side of the road :).
LOVE this idea! How did you keep the cover from falling out or your toddler from pulling it? Did you fasten it somehow? Thanks so much!!!
Jen
Hi Jen, the cover sits SUPER snugly under the lip of our existing fireplace box. I think it would be a challenge with little ones if not for that! :)
I’m going to do this on a 4×8 sheet of plywood and use it as a background for senior pictures! Thanks!
Love the idea!
I love this solution. I’m going to create the screen to cover a non-functioning fireplace in our basement. One question I have is how have the logs held up over time? I like the fresh cut look but worry about graying over time. Did you seal the logs to maintain the color? Thanks so much!
Hi Eliza! I didn’t spray or coat the logs with any sort of sealer but it has been mentioned here in the comments that that also might protect against potential termite damage. Definitely worth looking into. I haven’t had any greying so far on our logs.
You might want to consider sealing the logs with a shellac or flat matte spray to avoid any termite issues.
Also, seal and then paint both sides of the backboard to address the termite issue.
No matter where you live termites are there – and they love fresh wood!
Tom
Brilliant!!!! LOVE this!
Thank you, Nikki!
You mentioned Kevin chopped the logs into 3 inch pieces. Do you mind telling us how he did this and what type of saw or chopping tool he used. We have our project ready to go but this is the only thing we can’t figure out the best/easiest way to do. Thanks so much. I’m so looking forward to having this in my home.
Hi Kami, we used a chop saw but I think you could also could use a sawsall… I hope that’s helpful!