Pepper Design Blog

A Little of This & That... Renovating, Decorating, DIY Projects & Family

pepper_header_flower

Tech Tip: Amazingly Simple Graphic Designs

February 28, 2014 by Morgan

One of my favorite things to do as someone who works in marketing is to put together a catchy, well-designed piece of marketing material that is both modern and memorable. But coming up with ideas, layouts, graphics, images, fonts and so on constantly… it can be tough! And you have to be a bit savvy at tools such as Photoshop, Illustrator and InDesign to really make it happen.

Enter one of the coolest online tools I have found yet. Have you heard of Canva? Canva is a free website that features pre-made layouts, drag & drop graphics, fonts and colors making it easy for any user to pop in, pull together a professional looking flyer, invitation, postcard, brochure, blog graphic or even a Facebook cover, and publish it within minutes.

Tech Tips: Canva | PepperDesignBlog.com

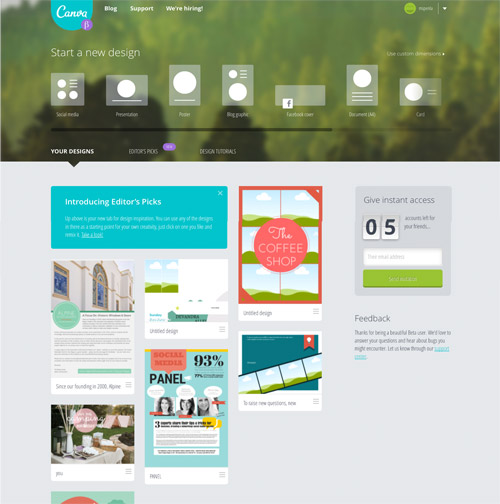
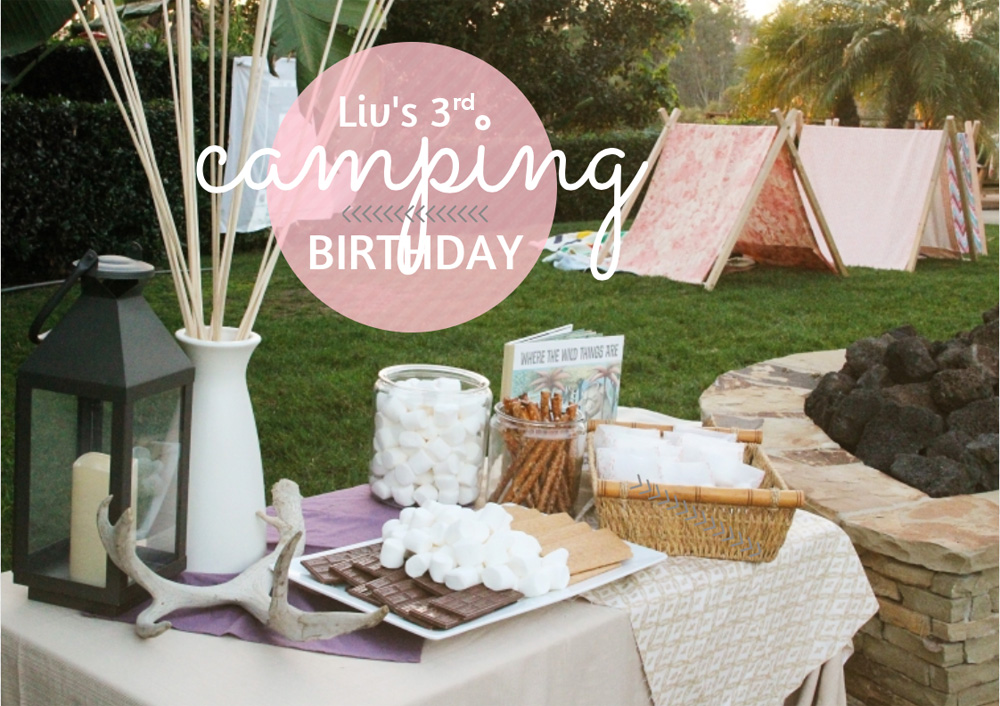
You can see some of my saved drafts above – even the graphic from Liv’s camping birthday post was a Canva graphic (and it took me 2 seconds to create).

Liv's 3rd Camping Birthday | PepperDesignBlog.com

Here’s a little bit about how the tool works and a preview of the workspace:

Tech Tips: Canva | PepperDesignBlog.com

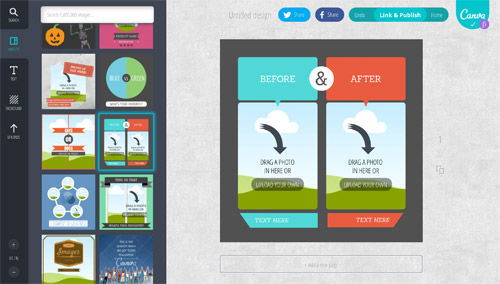
After logging in, 1. you choose which style of project you’re working on (i.e. a postcard or a poster), 2. an already designed layout for that project from their selection (or create your own), and finally 3. drag and drop from a library of really creative graphics (with and without editable text), fonts and images.

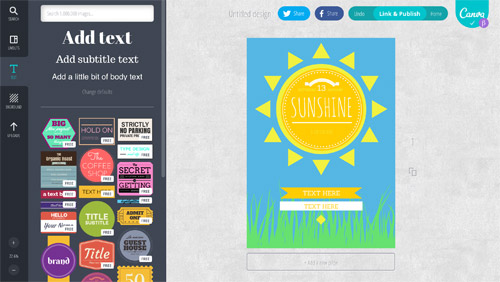
Above shows a sample of layouts available when I choose ‘social media graphic’, below a preview of the text graphics that you can include in your design.

Tech Tips: Canva | PepperDesignBlog.com

I upload my own photos for my work, but they have quite the selection of stock images available for a very small price (in the design world we pay big bucks for stock images). There is a paid portion of the site where you might shell out a $1 for something really unique, but I’ve used only the free graphics available and there are plenty.

It’s basically InDesign as a website. With most of the Illustrator work done for you :).

If you are a blogger, I highly recommend this for adding text and graphics to a pinnable picture of your projects – if you’re a mom, this tool is perfect for birthday invitations or photobook layouts – an entrepreneur or business owner? Check out the layouts they feature for business cards, posters and presentations.

I’m one for a super simple explanatory video, here’s Canva’s:

When I first joined it was by invitation only. If they ask you to hop on a waiting list I promise it won’t be long before they give you access. You must give it a try.

PS This is not a sponsored post, just another cool tool I’m sharing as part of a new series called ‘Tech Tips’. We’re two posts in, but if you’d like to check out the first on an email inbox management tool, it’s right here.

- posted on February 28, 2014 Filed Under: Graphics, Tech Tips, Tips & Ideas, Tools of the Trade

Bringing the Outdoors In, a New Houseplant Collection

February 26, 2014 by Morgan

On Sunday, while I was on my own with the girls for a bit, I took a trip to the nursery.

Houseplants | PepperDesignBlog.com

I am officially committed to bringing some of the outdoors in this spring and my office (which receives a ton of natural light) felt like a good place to start.

Houseplants | PepperDesignBlog.com

Houseplants | PepperDesignBlog.com

I have been drawn to clusters of potted plants lately… all of my inspiration is here. I’d post some of the actual photos with you but I’d rather you had nothing to compare to just yet.

After I got home that afternoon, I pulled my crazy assortment of collected containers from all over the house. I always knew that I was hoarding these pretty little vases, pots and ceramic odds and ends for a reason. Perhaps they were always intended for a serious houseplant collection!

Houseplants | PepperDesignBlog.com

At the nursery, I had been drawn towards a mix of lime, forest green and purple. When I had collected my pots I was happy to see that I actually had a little theme there, too in the form of bright turquoise, porcelain white and gold (with a navy and natural wood container here and there).

Houseplants | PepperDesignBlog.com

I had a rough idea of the final layout, but I played around a bit on our deck before choosing which plant would end up where. Most of these plants will grow fast and will need a bigger container at some point, but I have enough to go around! And I will just repot as necessary.

Houseplants | PepperDesignBlog.com

I chose to shop our local Armstrong nursery mostly because I wanted to pick the brain of an expert horticulturalist. I knew that I could find many of the varieties I was searching for at my local Lowe’s or Ikea for a lower price, but being the newbie houseplant lady that I am, I thought it wise to double and triple check that my selections were compatible with the space I had in mind, and to confirm on plant care. I was surprised when he actually rearranged my chosen selections a few times, but happy to bring home ‘easy’ varieties that would do well in indirect light.

While there, I picked up a bag of the recommended potting soil for my repotting purposes.

Houseplants | PepperDesignBlog.com

The one bummer about 90% of my saved vessels is that they don’t have drainage holes. This can be devastating for houseplants (and how I’ve previously killed several of mine) so I purchased plastic trays and used river rock in everything (and am crossing my fingers). The plastic trays mean that I didn’t repot those plants whose purchased plastic pots already fit in a container I have at home, I’m just putting a small plastic tray at the bottom of the actual pot to catch water and prevent root rot.

The river rock is something that I had on hand. I will use ice cubes for watering plants with river rock at the base so that water absorption is incredibly gradual in the soil, and so that no water pools at the bottom of the rocks.

Houseplants | PepperDesignBlog.com

When repotting, I used just a bit of the new soil and then most of the existing soil that the plants came home in. I gently massaged the roots to break them up before introducing them to their new home.

Houseplants | PepperDesignBlog.com

Houseplants | PepperDesignBlog.com

Aloe may have been what I was most looking forward to adding to our house. We grew up with a big aloe plant in my parent’s bathroom, when one of us had a boo boo we instinctively went to the plant, broke off a tip and rubbed our raw skin with fresh, gooey aloe. It was nature’s medicine at its best.

Here I am squeezing her out of her existing pot (no pulling, just squeezing) for replanting. She’s one that will definitely need a bigger pot in the future (again, fingers crossed).

Houseplants | PepperDesignBlog.com

A little bit of water for the startled plants as they adjust to their new homes, and into the house they go!

Houseplants | PepperDesignBlog.com

Houseplants | PepperDesignBlog.com

Houseplants | PepperDesignBlog.com

Houseplants | PepperDesignBlog.com

Those three wooden faceted planters are from Uncommon Goods and are possibly my favorites. They bring so much dimension and character with their usual geo shapes, they help to mix up a collection of round and rectangular pots.

Houseplants | PepperDesignBlog.com

If I start feeling like a crazy plant lady, I may break up my new collection and reallocate around the house. It’s already feeling verrrry houseplanty in here (but I’m not complaining yet).

On the plus side, I’m going to have a lot of clean air in this room.

Houseplants | PepperDesignBlog.com

Assorted pots were found at various thrift stores and garage sales, though I did pick up that gold guy and the ceramic white with black flowers at Anthropologie recently for a really excellent price ($12 each, maybe?). My favorite wooden faceted planters were c/o Uncommon Goods. They came with beautiful airplants which I was sure were artificial. Until they died. Now they are repotted with a very small ponytail palm that the gardner from Armstrong specifically recommended. The turquoise rectangular pot is from a going-out-of-business sale at a boutique in my neighborhood, the navy ceramic a find that I toted back from Iowa (wrapped in clothes and stuffed in a suitcase) two years ago. The gold chevron from this lady’s first business venture, original snake plant still going strong!

Plants include: above mentioned ponytail palms, rosette succulent (Perle von Nurnberg is the color), sedum ground cover in the rectangular turquoise pot, African violets in the white and black, aloe vera in my white urn, two different pothos’ (super easy to care for, I have one in the bedroom, too), a crawling fig (that will definitely need a larger pot),a snake plant and one fake impostor – can you spot him?

Houseplants | PepperDesignBlog.com

Wish my sweet little thumb luck!

- posted on February 26, 2014 Filed Under: DIY, Gardening, Home, Our Guestroom/Office, Projects, Renovating Adventures Tagged With: DIY, Gardening, Green, Houseplants, nature, Office

Guest Post: A Bright & White $3k Kitchen Remodel

February 25, 2014 by Morgan

I have two posts to share with you today. Mary, from over at A Mama Collective, asked me a while back if I would share her kitchen transformation on the blog. I was totally smitten with her new glass tile backsplash and their diy skills, and was very happy to share their (under $3k makeover) story with you. I asked Mary to put together that journey in her own words.

Meanwhile, she and her blogging co-host Jenna, asked if I would share my thoughts on motherhood in their February series. The theme is how love finds a way to weave  into our lives despite some of the more enduring struggles (busy-ness, temper, comparing to others…) of motherhood. I thought on this for a while. This topic is raw, this topic is real. Sometimes I much prefer to blog about paint colors and cocktails. But I accepted their challenge and you can read one of my completely transparent thoughts on guilt that I put together Saturday morning over here.

Back to Mary’s story… I’ll let her take it from here.

*************************************************************

A Mama Collective Guest Post | Kitchen Transformation | PepperDesignBlog.com

A Mama Collective Guest Post | Kitchen Transformation | PepperDesignBlog.com

 Since the moment I first walked into our then, soon-to-be home, I have been dying to re-do the kitchen.  Four years later, that dream finally became a reality.  Funds were limited, time too, but we managed to change our least favorite space in our house into our favorite. With a good amount of willpower, the right supplies, maybe even some connections, I bet you could do the same!  Let me tell you how we transformed our kitchen from drab to fab!

A Mama Collective Guest Post | Kitchen Transformation | PepperDesignBlog.com

Before

We knew new cabinets were not in the cards for us, so we decided to invest sweat equity and give them a makeover ourselves.  Our cabinets are that weird mix of wood and laminate, which makes for an interesting time painting, but interesting doesn’t mean impossible.  I did a good amount of research on how to paint cabinets and found this site and this site to be my new best friends.  (Thanks for the tips ladies!)

The most important tip, in my experience, is to get the cabinet doors as clean as possible.  And when you think you’re done, nope, clean them again!  We had A LOT of grime, grease and just overall buildup on our cabinets (see photo below) and I noticed that the paint had a harder time sticking the first round.  By the second round I decided to really put some muscle into my scrub and that seemed to do the trick.

A Mama Collective Guest Post | Kitchen Transformation | PepperDesignBlog.com

The second big tip is to invest in good, high quality paint.  Due to being on a budget, I fought the urge to buy the cheap paint for some time.  Reading Jenny’s experience with Benjamin Moore’s Advance paint sold me.  It’s this amazing water/oil mix.  I know what your thinking, oil and water don’t mix, and yeah, that’s why this paint is worth the money.  This revolutionary paint works on wood, laminate and that weird mix of wood and laminate that we have.  It’s easy to work with and applies evenly.  And the finish, well, I can’t say enough about the beautiful finish of this product, glossy, but thick and durable.  And since we completed this part of the project a couple months back, I have even had the great pleasure of cleaning them, and it was a breeze.  Some new stainless steal hardware, courtesy of an eBay find, and we already had an amazing update to our little kitchen.

A Mama Collective Guest Post | Kitchen Transformation | PepperDesignBlog.com

Next came the demo, aka my husband’s job.  He and a good friend took some mallets to those yucky white tiled counters, and I’m sure they got some pent up aggression out in the process.  This step was by far the messiest of all and it took a good couple of weeks to not feel like I was spreading that fine dust all around my house.

Then came the installation of the granite, which we did not DIY. ;)  We have a great friend who was able to get us a great deal on our granite, and really without that, I’m not sure if this project would have come to fruition.  Over the moon about the generosity of friends like him!

A Mama Collective Guest Post | Kitchen Transformation | PepperDesignBlog.com

We also updated our microwave and stove, and our sink and faucet.  Don’t underestimate the power of little details!  This great, modern, square sink combined with the stylish, contemporary faucet by Kraus is one of my favorite parts of our new kitchen.

A Mama Collective Guest Post | Kitchen Transformation | PepperDesignBlog.com

Once that was all installed, we were on to the backsplash.  As you can see, we have quiet the small kitchen, so we were able to go with a darker color to contrast with the white cabinets.  Grey, glass, 3×12 subway tiles were the perfect choice to create the warm, inviting, but modern feel we were hoping for.  Glass subway tiles are beautiful, but they are a pain in the, well you know what, to cut.  Order extra if you are planning to install yourself, like we did.  We lost many pieces to the learning curve.  Eventually it was a combination of a score and snap tile cutter and the right blade on the wet-saw  (Diamond Blade) for those curved cuts that did the trick.  Thank God for YouTube and the internet, teaching us all how to DIY.

Installation with glass subway tiles can be a bit tricky too. The 3×12 subway tiles that we chose did not come with the mesh backing that I hear makes instillation a piece of cake.  This means you lay each piece individually and place spacers in between.  It also means if you look really close to our wall you will see the rise and fall of the tiles.  Nothing major to the average on-looker, but to my stubborn self, it’s a bit of a disappointment.

A Mama Collective Guest Post | Kitchen Transformation | PepperDesignBlog.com

Overall, I am in love with my new, fabulous kitchen.  Also pretty darn proud that we did all of this for under $3,000 and that my husband and I didn’t kill each other or any of our children throughout the 3 month process.  I’m calling it a success, friends, success indeed!

Happy DIY’ing!

A Mama Collective Guest Post | Kitchen Transformation | PepperDesignBlog.com

*************************************************************

Thanks, Mary! How great are their new countertops? My favorite is still that beautiful grey glass backsplash.

Related Posts Plugin for WordPress, Blogger...

- posted on February 25, 2014 Filed Under: DIY, Guest Blog, Guest Post

  • « Previous Page
  • 1
  • …
  • 112
  • 113
  • 114
  • 115
  • 116
  • …
  • 438
  • Next Page »

Welcome to my little slice of the web where I practice finding family, career, homemade & inspired balance on a daily basis. This is where I capture my happy moments, and I'm honored that you're here to join us. Home + creativity + good eats + journaling + life as a working mom. Read more...

  • Email
  • Facebook
  • Google+
  • Instagram
  • Pinterest
  • RSS
  • StumbleUpon
  • Twitter

Search

Categories

Craft Projects CategoryCrafty Projects Good Eats & Recipes CategoryGood Eats Entertaining Ideas CategoryEntertaining Ideas Decorating Projects CategoryDecorating Style Boards CategoryStyle Boards Everything Holiday CategoryHolidays

Daily Dose

Favorite Posts

Dog Days of Summer: Craft Kits for Kids

Summer Craft Kits for Kids

August is a slower month for our family. Preschool summer school is out, dance lessons are taking a brief break for the month, our family vacation is

Our Double Stroller: Mountain Buggy +One Review

A Mountain Buggy +One Double Stroller Review

I'll preface by saying that this is not a sponsored review - we've found an awesome double stroller and we love it! Our Mountain Buggy + One has served

Wardrobe Style Board: A Work-From-Home Uniform

Wardrobe Style Board: A Stay-At-Home Mom Uniform | Cropped Light Jeans, Tan Sven Clogs, White Madewell V-Neck T-Shirt, Colorful Necklace, Gold Earrings | PepperDesignBlog.com

tan clogs | pocket tee | light jeans | gold disc earrings | colorful necklace It's not uncommon for people to come and go from our house all day long,

Happy 2nd Birthday, Taylor Rose!

Happy 2nd Birthday, Taylor Rose! An Infographic for My Girl | PepperDesignBlog.com

This weekend Taylor turned two. Taylor is such a bright, wonderful light in our lives. She is our funny, spunky little daughter that will do just about

How to Listen to Audiobooks on OverDrive

Intro to Audiobooks on OverDrive Public Library | PepperDesignBlog.com

Liv has developed a big interest in audiobooks as of late. One of my favorite ways for her to spend her 'quiet time' while Taylor and Marley nap is for her

Pistachio, Caramel & Sea Salt Chocolate Bars

Pistachio, Caramel & Sea Salt | Father's Day | PepperDesignBlog.com

Father's Day is not so far away, so here's an easy gift idea that can be made in advance or (literally) the night before. Homemade chocolate bars can be

Liv & Taylor-isms

Liv & Taylor-isms | Funny Things Kids Do & Say | PepperDesignBlog.com

Sometimes I capture something so funny/adorable/sweet that I can’t help but make note of it. Because Taylor is now expressing herself in full sentences, I

30 Things That I’ve Learned By 30

30 Things I've Learned by the Age of 30 | PepperDesignBlog.com

Today is my 30th birthday. I don't feel much older, but hearing that number roll out of my mouth feels as though I'm closing on a big chapter in my

Featured

Featured
VRBO San Diego Flying Bridge Vacation Rental cool toys for kids

Favorite Topics

Welcome to my little slice of the web where I practice finding family, career, homemade & inspired balance on a daily basis. This is where I capture my happy moments, and I'm honored that you're here to join us. Home + creativity + good eats + journaling. Read More…

  • Email
  • Google+
  • Instagram
  • Pinterest
  • RSS
  • StumbleUpon
  • Twitter
May 2025
MTWTFSS
« Feb  
 1234
567891011
12131415161718
19202122232425
262728293031 

Copyright © 2025 · Foodie Pro Theme by Shay Bocks · Built on the Genesis Framework · Powered by WordPress