Pepper Design Blog

A Little of This & That... Renovating, Decorating, DIY Projects & Family

pepper_header_flower

Liv’s Play Kitchen: The Break Down

May 31, 2013 by Morgan

Back as promised to share some of the details of Liv’s new kitchen!

Liv's Little Kitchen | PepperDesignBlog.com

I might be as excited about this project as she is (maybe even more so) because it was a bit of a labor of love. As Kevin comments to everyone that checks it out “and it took twice as long to build the little version than it did to build the big version”. Smirk, but true, true ;). Mine may not be as practical or useful or anywhere near the size of our actual kitchen (which Kev really did whip up in about three months), but I’m still pretty smitten with it.

Building the New Play Kitchen | PepperDesignBlog.com

It all started when I began to collect little bits of mini kitchen inspiration way back when Liv was waaaay too small to even know what a kitchen was. I just knew that one day I wanted to build one. It was that inner kid imagination – the channeling of building mini anything (which I did all the time as a wee one) to be as realistic as possible. Did you ever build your Puppy Surprise stuffies a pretend house in your desk at school? Every girl in my kindergarten class would be raising her hand. Or how about a lair for your GigaPet? Or the perfect dollhouse? Those were the days.

My version of an adult dollhouse (and I guess that makes Liv my little doll):

Liv's Little Kitchen | PepperDesignBlog.com

Inspiration in hand, I thought I might try and convert an older media unit into a cool kitchen. Or perhaps a left over set of garage/kitchen cabinets. Anything rescued and transformed from a thrift store or the Habitat for Humanity Re-Store would be awesome. But since I had a very specific spot in mind for the little kitchen (the end of our island in our kitchen), measurements never quite worked out. And the prices weren’t super either.

Building the New Play Kitchen | PepperDesignBlog.com

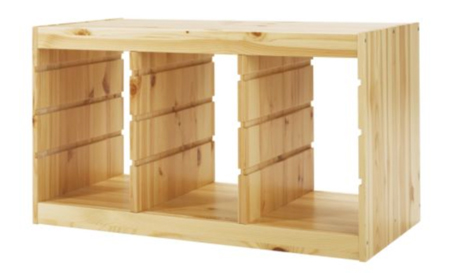
Enter a little trip to Ikea for browsing and the TROFAST toy storage unit which checked out in price and size. The price for the pine version was a little on the heavy side, while the white particle board version was more my budget. But I was worried about applying paint to the particle board (and it lasting a while without chipping) and so decided to play it safe with the pine.

littlekitchen_ikeacollage_500

(We have fun at Ikea.)

Assembling was tons of fun in that special Ikea way (har, har). Here I am at Christmas time tackling this beast. As with most Ikea products, I’m pretty sure I had to assemble twice and disassemble once before it was put together correctly :).

Building the New Play Kitchen | PepperDesignBlog.com

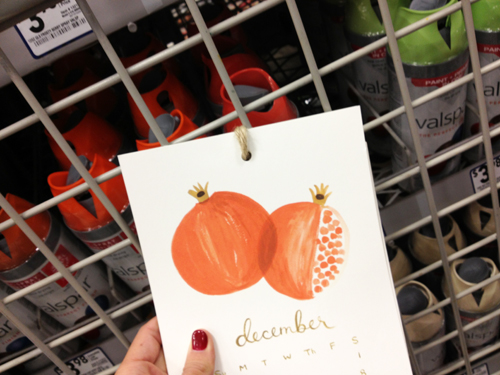
When choosing a color, an orangey-red kept coming back to me again and again. I finally color matched a pomegranate illustration from one of my favorite Rifle calendars that hung in the kitchen at the time (but with actual paint and not spray paint, wouldn’t that have been nifty?).

Building the New Play Kitchen | PepperDesignBlog.com

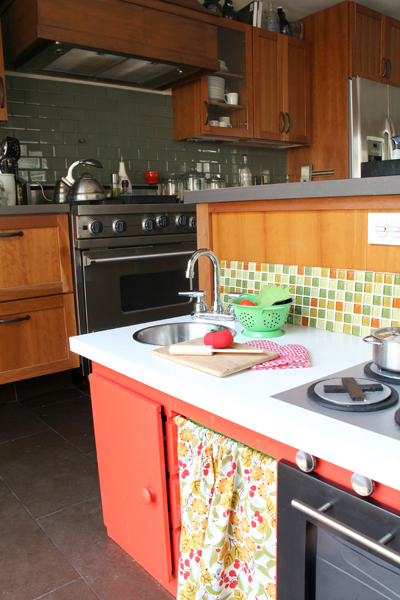
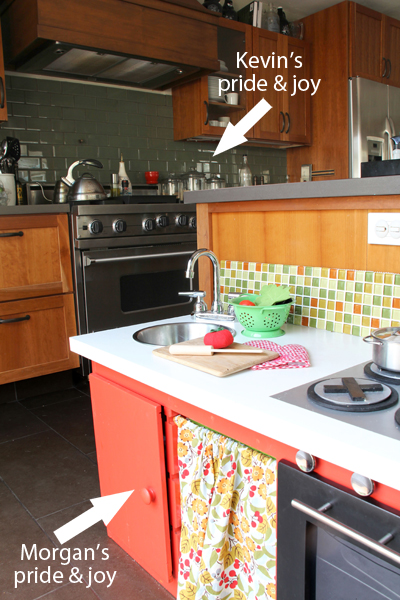
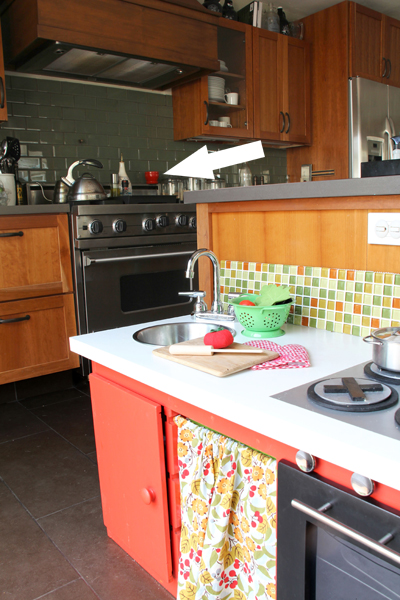
That burnt orange is definitely a favorite accent of mine in our mostly green kitchen. It pops up here and there.

Building the New Play Kitchen | PepperDesignBlog.com

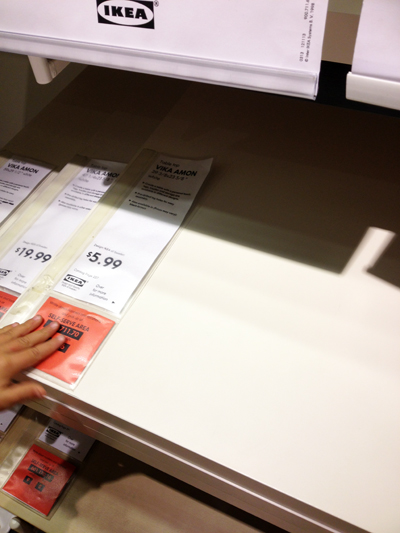
The counter is from the VIKA desk collection at Ikea and fit the storage unit lengthwise perfectly. No chopping required. We did have to cut it down about 3″ or so in the width but for $5.99 you just can’t beat it. Five months into life it’s experiencing some wear and tear which is a bummer (but what can you expect from particle board).

Building the New Play Kitchen | PepperDesignBlog.com

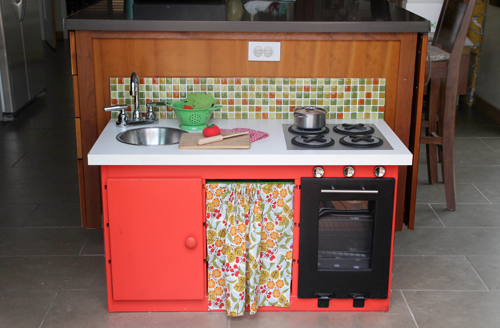
The TROFAST shelves (which were made to fit the little slots of the toy storage unit) covered the front of each compartment of the toy unit near perfectly so we converted one into a door that opened like a cabinet and one that opened like an oven door with two hinges each.

Building the New Play Kitchen | PepperDesignBlog.com

Liv's Little Kitchen | PepperDesignBlog.com

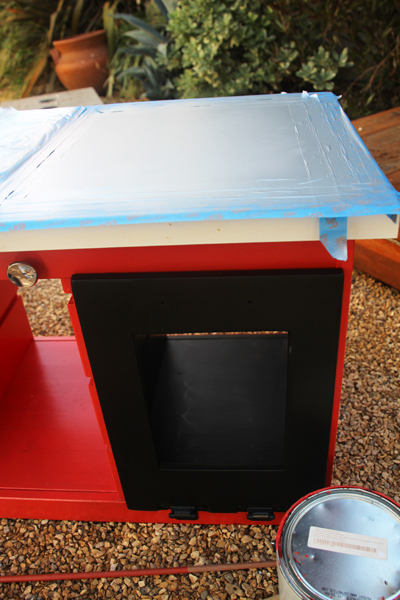
The oven door itself was cut to add a little window so you could see inside of the oven, then we lined it with clear plastic from an Ikea frame.

Liv's Little Kitchen | PepperDesignBlog.com

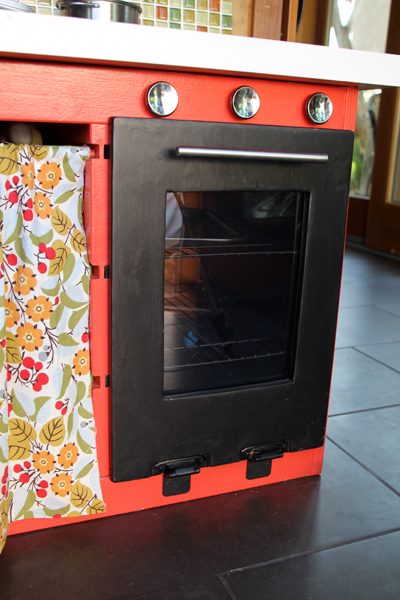
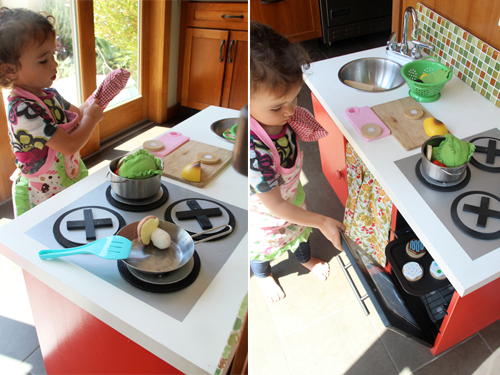
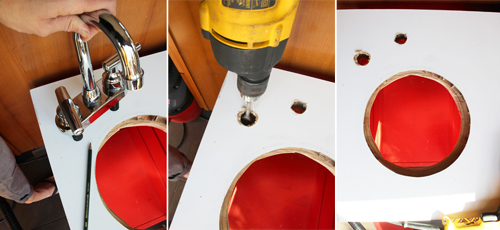
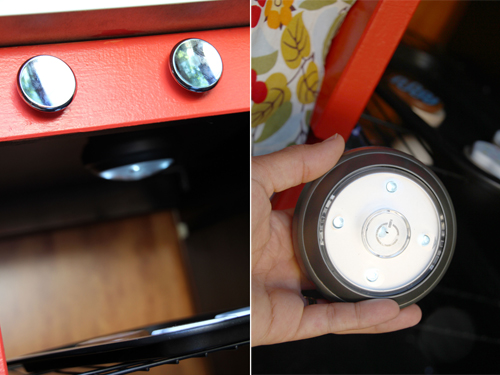
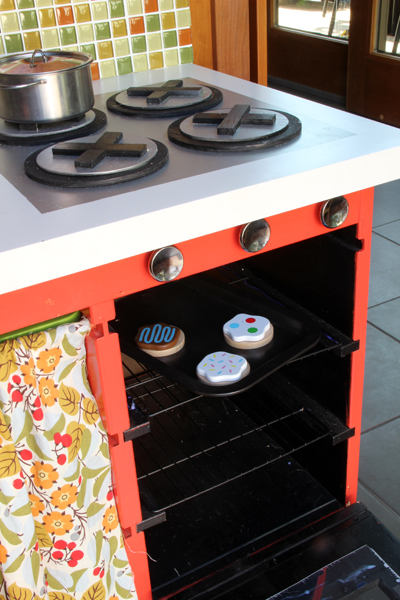
We drilled and installed three little silver knobs (from the hardware store) so that you could ‘turn on’ the stove.

Liv's Little Kitchen | PepperDesignBlog.com

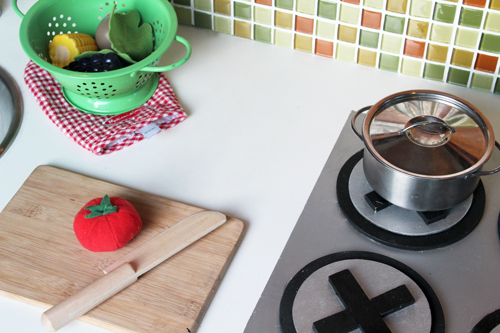
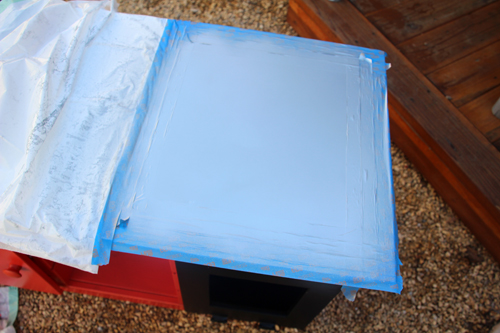
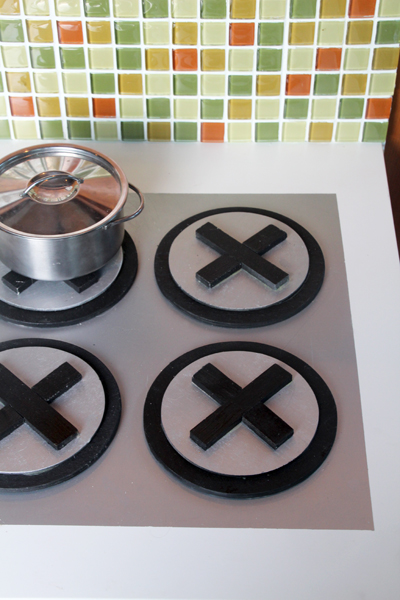
Speaking of stove, creating the range was as simple as taping off a square on the top of the countertop and spray painting it silver. I’m a big fan of using garbage bags as mini drop cloths for projects just like these, they’re easy to reuse for an entire project but you can throw them away (with all of your empty paint cans and trash in them) when you’re done. I’ve taped off the entire left hand side of the counter with a trash bag here.

Building the New Play Kitchen | PepperDesignBlog.com

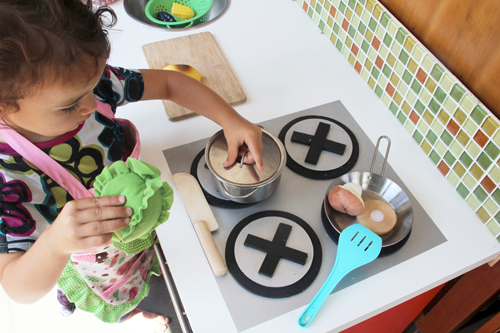
The Junkman on Etsy is my go-to guy for unusual wood cuts and he came through for me with two sets of plywood circles, one 4 1/2″ and one 5 1/2″. I spray painted the larger circle black and topped it with a silver spray painted smaller circle, and then a small wooden X shape in black again to complete the burners.

Liv's Little Kitchen | PepperDesignBlog.com

But that was actually my May stove top fix. I actually attempted to use furniture moving discs (from Joann’s) initially:

Building the New Play Kitchen | PepperDesignBlog.com

Peeling paint + pretend food consumption = bad. Bummer. The newer solution is 10x better! and cuter:

Liv's Little Kitchen | PepperDesignBlog.com

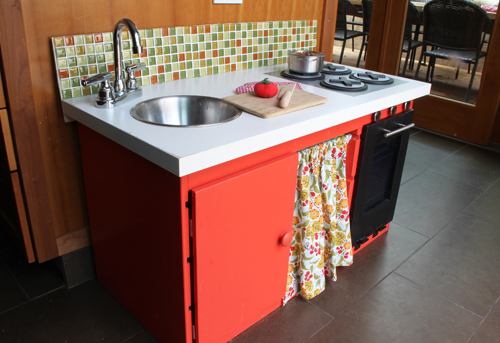
I stole the sink idea from most play kitchen builders that have gone before me: measure a metal mixing bowl (with a lip) to size, cut out to fit in your countertop. The lip on the metal bowl should keep it in place.

Liv's Little Kitchen | PepperDesignBlog.com

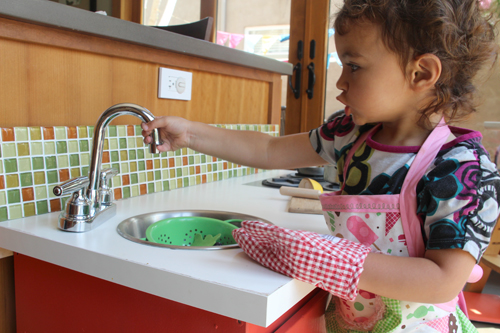
I found the bar sink on either Amazon or eBay, can’t recall (but both are great for tracking one down) for $15 ish.

Building the New Play Kitchen | PepperDesignBlog.com

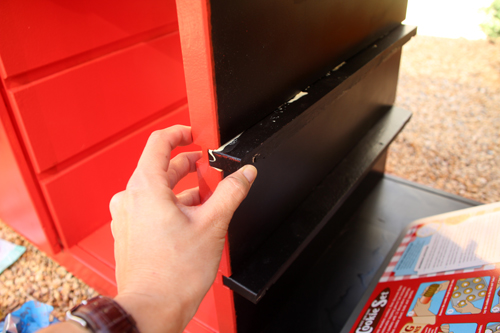
Let’s talk about the oven for just a second. I painted the inside of the third compartment of the TROFAST unit black and we cut down one of the TROFAST shelves into four skinny pieces to hold the oven racks.

Building the New Play Kitchen | PepperDesignBlog.com

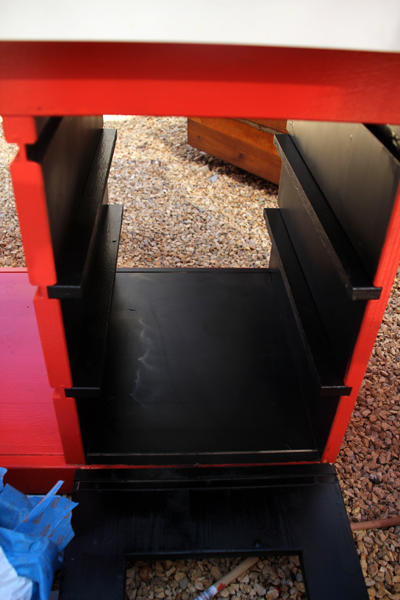
A little wood glue (be sure wipe off the excess that squeezes out) ensures they’re stuck in place.

Building the New Play Kitchen | PepperDesignBlog.com

Building the New Play Kitchen | PepperDesignBlog.com

I added a little push light to the inside of the oven just for fun, though I’m sure it’s going to run out of batteries soon since Liv loves to keep it on all. of. the. time.

Liv's Little Kitchen | PepperDesignBlog.com

The oven racks themselves are from a two-tiered cooling rack that I found on Amazon and cut the legs off of, I then glued (with a glue gun) the racks directly to the little black shelves.

Liv's Little Kitchen | PepperDesignBlog.com

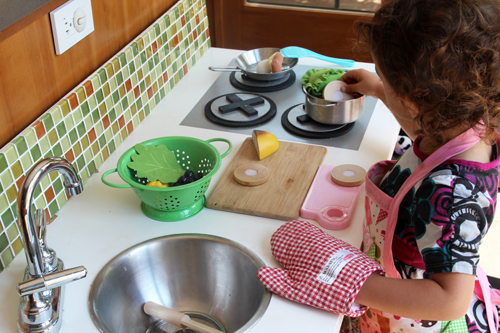
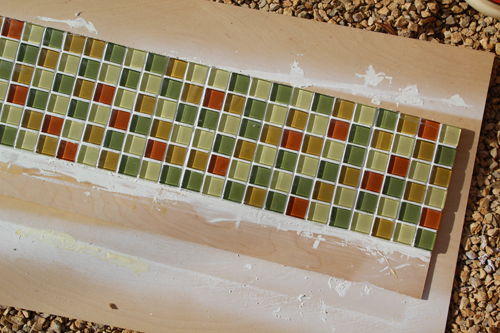
The backsplash was a recent addition. As the little kitchen sat in its spot, I kept picturing something that would give the cabinet unit a little height and a fun backsplash kept coming to mind. I trolled eBay for a bit and found this lovely green, mustard yellow and orange 1″ tile and was able to talk the seller down to a pretty sweet price (I can’t really imagine this tile in someone’s modern bathroom or kitchen… but it’s perfect for my little one!).

Building the New Play Kitchen | PepperDesignBlog.com

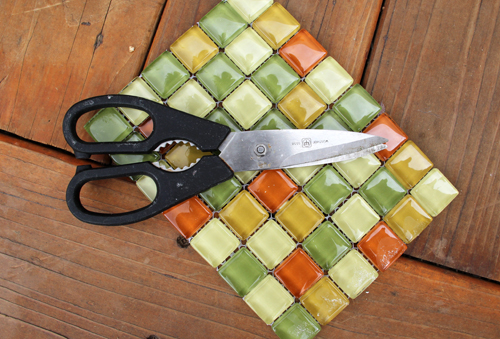
Using a piece of plywood cut to size as my base, I adhered, grouted and sponged my tile into place.

We had left over grout around the house but if you’re not wanting to buy a bulk bag from a home improvement store most craft stores sell small bags for mosaic projects. A little water plus a little grout plus a sponge brush (my favorite tool for small projects and if you don’t have actual tile tools lying around).

Building the New Play Kitchen | PepperDesignBlog.com

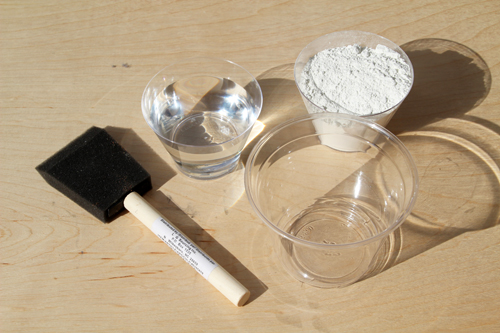
Use thin set (or even glue ;)) to attach tile (with mesh backing) to plywood. Apply a generous amount of grout to your tile surface while also really pushing that grout into the cracks between your tile (watch it as it begins to dry so that you can catch cracks in your grout and add a little more).

Building the New Play Kitchen | PepperDesignBlog.com

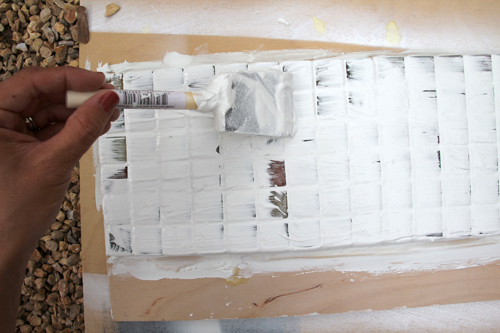
Use fingers when necessary.

Building the New Play Kitchen | PepperDesignBlog.com

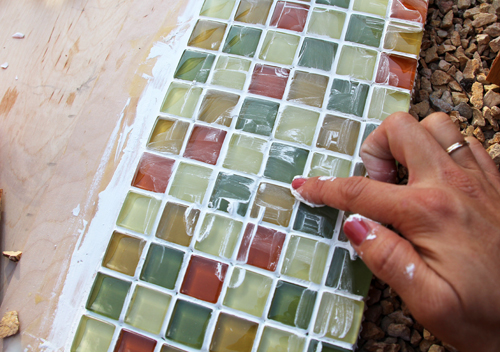
Then begin to slowly wipe away the grout from the tops of the tile pieces while the grout is still wet. A sponge, towel or even paper towels can be great for this.

Building the New Play Kitchen | PepperDesignBlog.com

Building the New Play Kitchen | PepperDesignBlog.com

I then added the backing to the back of the kitchen (not the countertop, which is particle board, but the actual pine unit):

Liv's Little Kitchen | PepperDesignBlog.com

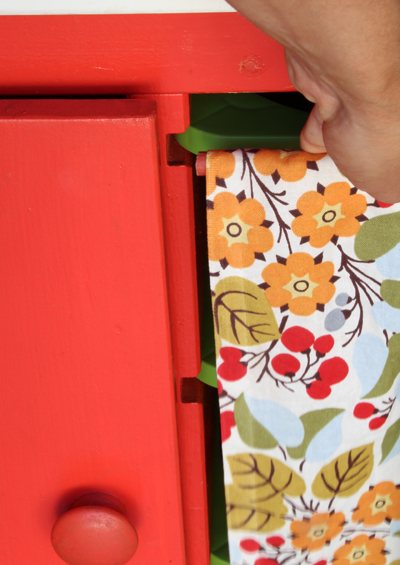
Last but not least are the TROFAST storage bins and the dowel + curtain that we assembled with iron-on hem tape for the door to the middle unit:

Liv's Little Kitchen | PepperDesignBlog.com

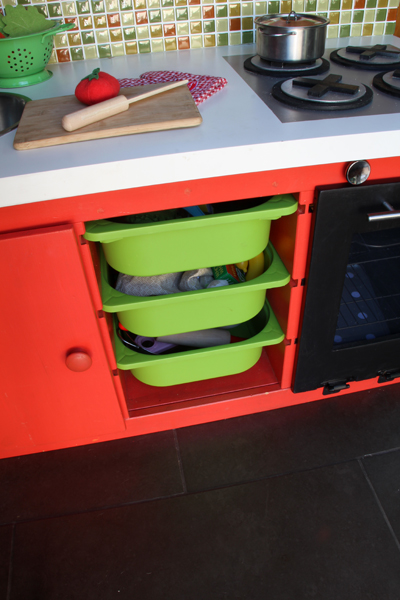
The cute floral fabric is a remnant of mine from my fabric bin, but I’m almost positive it’s from Joann’s. The dowel worked out well because it fit perfectly into the top notch of the toy unit (the notch for those green bins) that was already built into place.
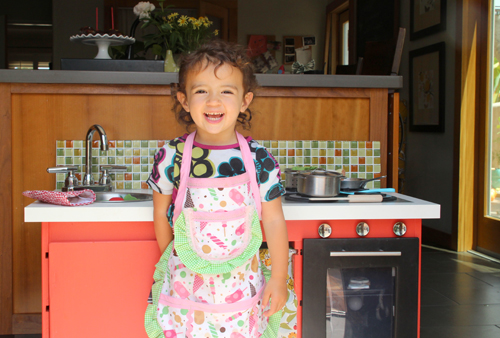
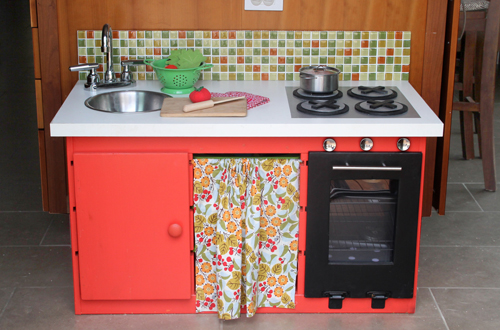
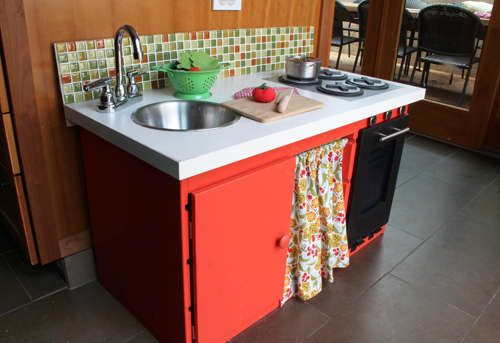
Liv's Little Kitchen | PepperDesignBlog.com

Finished!

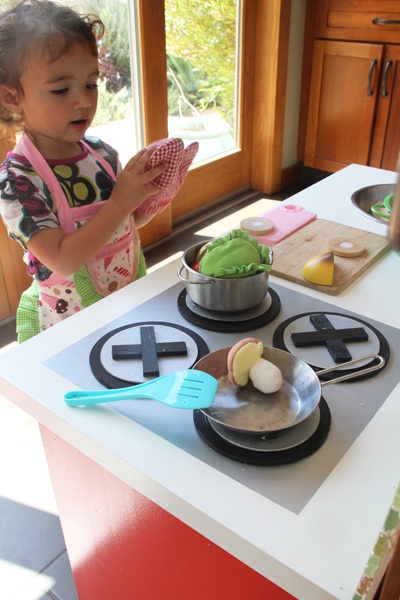
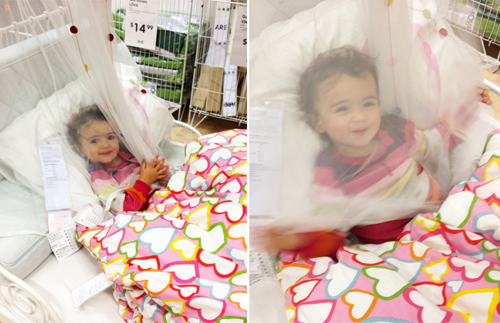
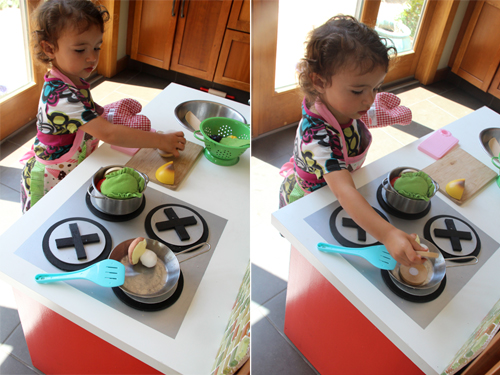
The only missing component? One happy little chef:

Liv's Little Kitchen | PepperDesignBlog.com

Liv's Little Kitchen | PepperDesignBlog.com

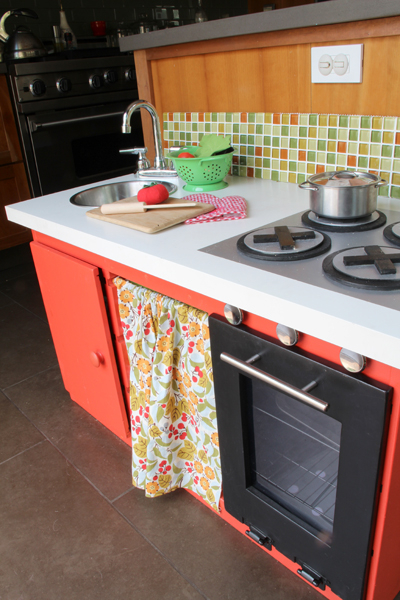
And one happy momma who is so happy with how it turned out.

Liv's Little Kitchen | PepperDesignBlog.com

Happy weekend!

- posted on May 31, 2013 Filed Under: Craft Projects, Crafty Solutions, DIY, Handmade Gifts, Home, Kid's Projects, Olivia, Our Kitchen Remodel, Projects, Renovating Adventures, Tutorial Tagged With: Accessories, Before & After, Crafty Solutions, Decorating, DIY, Green, Handmade Toys, Home, Orange, Tutorial

Liv’s Play Kitchen: Finished!

May 29, 2013 by Morgan

Remember back here when I decided to build Liv a little kitchen for Christmas (and shared all of the inspiration for my favorites)? Well five months later and…. it’s finished!!

It’s been one of those projects where I’ve sllloooowwwlly added and added to it over the months. It probably should have been considered finished in January when my Dad and I designed and assembled all of the little pieces (and when we revealed it for her birthday rather than at Christmas time). But then I added a faucet in February, baking racks and an oven light in March, redid the stove range and added a backsplash in April… and it slowly evolved into an obsession. I have to stop. So as of today, I’m marking it done and done!

Liv's Little Kitchen | PepperDesignBlog.com

Liv's Little Kitchen | PepperDesignBlog.com

Liv's Little Kitchen | PepperDesignBlog.com

Liv's Little Kitchen | PepperDesignBlog.com

I’ll be sure to share some of the how-tos and progress pics this week.

Liv's Little Kitchen | PepperDesignBlog.com

One of my main goals was to build a little kitchen that would work well with our big kitchen. That way Liv would have something fun and interactive to do while we were working in the kitchen (the hub in our house) and could participate in the ‘cooking’ – and we could have a toddler toy that wasn’t plastic or an eye sore in plain view.

The finished mini kitchen fits perfectly at the end of our island, and I chose all of the colors to be more upbeat, kid-friendly versions of the colors that we have throughout our own kitchen space.

Liv's Little Kitchen | PepperDesignBlog.com

After quite a bit of research (and hunting through Craigslist, thrift stores and what not for the right sized cabinet), I used the TROFAST toy storage unit and plastic bins from Ikea for the little wooden base, and a basic white Ikea desk top that fit the unit near perfectly for the countertop (can’t seem to find the link online at the moment, but it was 39″ long and we sheared off just a bit of the width at the back so that there was just a tiny lip over the storage unit). The orange door on the left and black oven door were both shelves built for the TROFAST unit as well that we converted with hinges.

Liv's Little Kitchen | PepperDesignBlog.com

Liv's Little Kitchen | PepperDesignBlog.com

Little extra features include a bar sink that works well as a faucet (which Liv has already requested ‘please make it work’, ha!):

Liv's Little Kitchen | PepperDesignBlog.com

A stove top:

Liv's Little Kitchen | PepperDesignBlog.com

Liv's Little Kitchen | PepperDesignBlog.com

An oven with two little racks and an oven light for baking:

Liv's Little Kitchen | PepperDesignBlog.com

Liv's Little Kitchen | PepperDesignBlog.com

Little knobs that spin for the stove and a handle, hinges + plexiglass for the oven door:

Liv's Little Kitchen | PepperDesignBlog.com

And for toy food storage, a large door to hide bigger bowls and tools, and a fabric curtain to cover up three plastic Ikea bins:

Liv's Little Kitchen | PepperDesignBlog.com

The dowel at the top of the curtain fits right into the notches that were already built into the Ikea toy unit (the fabric remnant is from Joann’s):

Liv's Little Kitchen | PepperDesignBlog.com

And the entire curtain can be removed during playtime to reveal the bins of felt and plastic foods, wooden cutting boards, aprons and the rest of that fun stuff:

Liv's Little Kitchen | PepperDesignBlog.com

Thanks, Dad for all of your help assembling this guy! He was my powertool man over Christmas and he troubleshooted problems like the oven doors, unbreakable plexiglass and installing the bowl for the sink. I added most of the little design details later when all mellowed down.

Liv's Little Kitchen | PepperDesignBlog.com

Liv's Little Kitchen | PepperDesignBlog.com

So much work! But Liv loves it and that’s what matters most. And I have loved being super creative with the design and build, troubleshooting how I could add a mini backsplash or what way to attach the oven racks into the inside of the oven :-). It’s what I live for! In retrospect it would have been cheaper and easier to purchase a pre-built kitchen, but sometimes you just can’t beat the DIY.

Liv's Little Kitchen | PepperDesignBlog.com

Liv's Little Kitchen | PepperDesignBlog.com

Be back shortly with the source list and the steps to build!

- posted on May 29, 2013 Filed Under: Crafty Solutions, DIY, Family & Friends, Favorites, Handmade Gifts, Home, Olivia, Our Kitchen Remodel, Projects, Renovating Adventures, Tutorial Tagged With: Accessories, Before & After, Crafty Solutions, Decorating, DIY, Green, Home, Kitchen, Orange, Tutorial

Shhhhh, a Secret: Magic Belly Stretch Mark Cream

May 28, 2013 by Morgan

Hope you had a restful, memorable and happy Memorial Day! We had such a busy weekend, but the best sort of birthday + holiday combo busy weekend. I love three day weekends. I won’t recap it all here (I’ve thrown a lot of family/personal posts at you lately) but feel free to follow along over on Instagram for more regular updates (birthday cakes and parades and cute pictures of Liv).

Instagram_MemorialWeekend2013b

I do have a quick post that I wanted to tag on to last Friday’s little maternity snapshot for baby #2. I know that all of us mommas (or future mommas) will deal with this little dilemma in some way or another and I wanted to pass on a secret recipe that my mom has passed on to me for each of my pregnancies: my mom’s very own Magic Belly Stretch Mark Cream.

Magic Belly Stretch Mark Cream : PepperDesignBlog.com

Not a fun topic. But who likes all of those terrible spider veins and bleached lines? Our skin stretches so darn fast when we are growing a little life that it’s inevitable (even with the magic cream), but if you care for the elasticity of that stretching skin you lesson the chance of any drastic or permanent marks.

I’m happy to say that after Liv my belly went right back to where it started at (even if it was 1 year later…) and no stretch marks remained. But I know we are not all as lucky and I know that this next time might be different (my skin might have a ‘been here done this before’ moment where it decides to ‘stay there’ after all). Fingers crossed that doesn’t happen.

During the actually pregnancy, I’m terribly prone to all things ugly belly. Namely stretch marks. That’s where these ingredients fit in:

Magic Stretch Mark Cream Recipe : PepperDesignBlog.com

Okay, ready for the secret recipe? It’s not an exact science (it’s more of ‘a little of this, a lot of that’ sort of recipe), but I hovered over my amazing mom until she gave up the goods that are in that sweet little bottle she sends me so that I could share them here with you, and here’s her blend:

Magic Belly Stretch Mark Cream

m
Start with an empty pump container and roughly 16 oz of your favorite non-scented, moisture-rich lotion.

Add the good stuff:
*6 oz aloe vera
*1 oz 100% cocoa butter
*2 oz lanolin
*8 oz 100% glycerin
*1 oz vitamin E oil

Mix well.

When my skin is feeling particularly stretchy – which leads to particularly itchy – I mix with 1% hydrocortisone cream. This concoction help aids sun relief, too (minus the cortisone)! I try to apply twice a day (like when changing into or out of PJs) and start at about 4-5 months into pregnancy. I also use my magic cream well into those post-partum months as everything begins to ‘shrink’ back to size.

Much pregnancy love from me to you.

Related Posts Plugin for WordPress, Blogger...

- posted on May 28, 2013 Filed Under: Family & Friends, Motherhood Tagged With: Pregnancy, Wardrobe - Maternity

  • « Previous Page
  • 1
  • …
  • 155
  • 156
  • 157
  • 158
  • 159
  • …
  • 438
  • Next Page »

Welcome to my little slice of the web where I practice finding family, career, homemade & inspired balance on a daily basis. This is where I capture my happy moments, and I'm honored that you're here to join us. Home + creativity + good eats + journaling + life as a working mom. Read more...

  • Email
  • Facebook
  • Google+
  • Instagram
  • Pinterest
  • RSS
  • StumbleUpon
  • Twitter

Search

Categories

Craft Projects CategoryCrafty Projects Good Eats & Recipes CategoryGood Eats Entertaining Ideas CategoryEntertaining Ideas Decorating Projects CategoryDecorating Style Boards CategoryStyle Boards Everything Holiday CategoryHolidays

Daily Dose

Favorite Posts

Dog Days of Summer: Craft Kits for Kids

Summer Craft Kits for Kids

August is a slower month for our family. Preschool summer school is out, dance lessons are taking a brief break for the month, our family vacation is

Our Double Stroller: Mountain Buggy +One Review

A Mountain Buggy +One Double Stroller Review

I'll preface by saying that this is not a sponsored review - we've found an awesome double stroller and we love it! Our Mountain Buggy + One has served

Wardrobe Style Board: A Work-From-Home Uniform

Wardrobe Style Board: A Stay-At-Home Mom Uniform | Cropped Light Jeans, Tan Sven Clogs, White Madewell V-Neck T-Shirt, Colorful Necklace, Gold Earrings | PepperDesignBlog.com

tan clogs | pocket tee | light jeans | gold disc earrings | colorful necklace It's not uncommon for people to come and go from our house all day long,

Happy 2nd Birthday, Taylor Rose!

Happy 2nd Birthday, Taylor Rose! An Infographic for My Girl | PepperDesignBlog.com

This weekend Taylor turned two. Taylor is such a bright, wonderful light in our lives. She is our funny, spunky little daughter that will do just about

How to Listen to Audiobooks on OverDrive

Intro to Audiobooks on OverDrive Public Library | PepperDesignBlog.com

Liv has developed a big interest in audiobooks as of late. One of my favorite ways for her to spend her 'quiet time' while Taylor and Marley nap is for her

Pistachio, Caramel & Sea Salt Chocolate Bars

Pistachio, Caramel & Sea Salt | Father's Day | PepperDesignBlog.com

Father's Day is not so far away, so here's an easy gift idea that can be made in advance or (literally) the night before. Homemade chocolate bars can be

Liv & Taylor-isms

Liv & Taylor-isms | Funny Things Kids Do & Say | PepperDesignBlog.com

Sometimes I capture something so funny/adorable/sweet that I can’t help but make note of it. Because Taylor is now expressing herself in full sentences, I

30 Things That I’ve Learned By 30

30 Things I've Learned by the Age of 30 | PepperDesignBlog.com

Today is my 30th birthday. I don't feel much older, but hearing that number roll out of my mouth feels as though I'm closing on a big chapter in my

Featured

Featured
VRBO San Diego Flying Bridge Vacation Rental cool toys for kids

Favorite Topics

Welcome to my little slice of the web where I practice finding family, career, homemade & inspired balance on a daily basis. This is where I capture my happy moments, and I'm honored that you're here to join us. Home + creativity + good eats + journaling. Read More…

  • Email
  • Google+
  • Instagram
  • Pinterest
  • RSS
  • StumbleUpon
  • Twitter
May 2025
MTWTFSS
« Feb  
 1234
567891011
12131415161718
19202122232425
262728293031 

Copyright © 2025 · Foodie Pro Theme by Shay Bocks · Built on the Genesis Framework · Powered by WordPress